45 Best Savory Snacks for Parties, Game Day, or Anytime
When those salty, cheesy, crunchy cravings hit, sweet snacks just don’t cut it. I’ve always been a savory snack kind of person. Give me a warm, melty dip or a handful of perfectly seasoned pretzels any day. Over the years, I’ve gathered a bunch of go-to recipes that are perfect for sharing (or keeping all to myself, if I’m being honest).
This collection of 45 savory snacks is packed with flavor and variety, think crispy bites, cheesy finger foods, and snack mixes that disappear faster than you can refill the bowl. Some are quick and easy, others are a little more indulgent, but they all have one thing in common: they’re seriously satisfying. These are the kinds of snacks that get everyone crowding around the table and reaching for just one more.
I’ve pulled together ideas that work for every occasion, game day spreads, birthday parties, road trip snacks, or just a movie night at home. If you love bold flavors, melty cheese, and anything wrapped in puff pastry, you’re in for a treat.
1. Chicken Cordon Bleu Sliders

If you love the flavors of chicken cordon bleu but don’t feel like messing with rolling and stuffing chicken, these sliders are the way to go. They’re everything I crave in a savory snack – crispy chicken, melty Swiss, salty ham, and that buttery garlic topping on sweet Hawaiian rolls? Absolute heaven. They’re easy to throw together, great for feeding a hungry crowd, and always one of the first things to disappear at any party.
GET THE RECIPE2. Bacon-Wrapped Meatballs with BBQ Glaze

These bacon-wrapped meatballs are the ultimate savory snack – smoky, saucy, and totally addictive. I always keep a bag of frozen meatballs in the freezer just for this kind of thing, because once you wrap them in bacon and brush on that BBQ glaze, they turn into something seriously special. They’re perfect for game day or parties, and the toothpick presentation makes them easy to grab and go… although I usually end up parked by the tray, going back for more!
GET THE RECIPE3. Baked Mushroom Dip

If you’re a mushroom lover like me, this baked dip is a total dream. It’s warm, creamy, and loaded with savory flavor thanks to the gooey cheese and perfectly seasoned mushrooms. I love serving it with buttery crackers or toasted baguette slices, it disappears fast every time I bring it out. It’s cozy, comforting, and just fancy enough to feel a little special without being fussy.
GET THE RECIPE4. French Onion Beef Dip Sliders

These French Onion Beef Dip Sliders are one of my all-time favorite savory snacks – melty cheese, tender roast beef, crispy onions, and buttery rolls all in one bite? Yes, please. They’re warm, hearty, and totally satisfying, especially when you dunk them in that rich au jus. I love making these for game day or cozy weekend lunches, and they’re always a huge hit with both kids and adults. It’s like the best parts of a deli sandwich and French onion soup came together in slider form!
GET THE RECIPE5. Candied Bacon Twists

Candied Bacon Twists are one of those snacks that people can’t stop talking about, and for good reason. They’re sweet, salty, sticky, and crispy all at once, with just the right amount of chew. I like to make a batch when I’ve got friends coming over or if I just want something fun and a little indulgent. Plus, they smell amazing while they’re baking, which is basically a built-in appetizer alert for anyone nearby!
GET THE RECIPE6. Chicken Parmesan Stuffed Peppers

These Chicken Parmesan Stuffed Peppers are my idea of comfort food with a little extra flair. You get all that saucy, cheesy goodness packed inside a colorful pepper, it’s cozy, satisfying, and way more fun than your typical casserole. I love how the filling comes together in one bowl, and once they’re baked and bubbly, they look as good as they taste. Perfect for game day, potlucks, or just when I’m in the mood for something hearty without too much fuss.
GET THE RECIPE7. Mini Chili Cheese Dog Sliders

These Mini Chili Cheese Dog Sliders are pure comfort food in bite-sized form, and I’m obsessed. They’re messy in the best way – ooey, gooey, cheesy, and packed with flavor. I love making these for parties or movie nights when I want something fun and a little nostalgic. You get all the flavors of a classic chili cheese dog, but wrapped up in a warm, fluffy Hawaiian roll. It’s snack perfection, honestly!
GET THE RECIPE8. Corn Dip

This corn dip is one of those snacks that’s always a hit – cool, creamy, a little smoky from the bacon, and packed with flavor in every bite. I throw it together whenever I need something easy but crowd-pleasing, and it disappears fast! I love serving it with tortilla chips, but honestly, I’ve caught myself sneaking spoonfuls straight from the fridge. It’s the perfect mix of sweet corn, cheesy goodness, and a little kick from the green chilis and Rotel.
GET THE RECIPE9. Cream Cheese Veggie Dip

This cream cheese veggie dip is one of my go-to snacks when I want something quick, creamy, and full of herby flavor. It’s super simple to whip up, but it tastes like something you’d find on a fancy veggie tray. I love pairing it with crunchy carrots, bell pepper strips, or even crackers when I’m feeling snacky. It’s cool, savory, and seriously addictive, perfect for parties or just keeping in the fridge for mid-afternoon munchies.
GET THE RECIPE10. Mini Pigs in Blankets

Mini pigs in blankets are one of those snacks that instantly takes me back to childhood parties, and I still love them just as much now. They’re golden, buttery, and bite-sized perfection, with that cozy combo of flaky pastry and juicy little sausages. I like to brush them with a bit of egg wash and sprinkle on poppy seeds to fancy them up just a touch. They’re always a hit at gatherings, and honestly, I could snack on these all day long.
Servings: 24 mini pigs
Ingredients:
- 1 refrigerated can of croissant dough (with 12 croissants)
- 24 cocktail sausages (pre-cooked)
- 1-2 eggs, beaten (for egg wash)
- 1 tsp poppy seeds, for sprinkling
Instructions:
-
Preheat your oven to the temperature indicated on the croissant dough package, usually around 350°F (175°C).
-
Open the refrigerated can of croissant dough and carefully unroll it. You’ll find 12 triangular pieces of dough.
-
Cut along the perforated lines of the dough triangles to make 24 smaller triangles. This will provide enough dough to wrap around each mini sausage.
-
Take one of the smaller dough triangles and place a mini sausage at the wide end of the triangle. Roll the dough around the sausage. Repeat with all the sausages and dough triangles.
-
In a small bowl, beat the eggs. Using a pastry brush or your fingers, lightly brush each wrapped sausage with the beaten egg to help the dough brown nicely during baking.
-
Sprinkle poppy seeds over the egg-washed dough-wrapped sausages for a pleasant visual appeal and subtle nutty flavor.
-
Place the prepared mini piggies in a blanket on a baking sheet lined with parchment paper, leaving space between each one for even baking.
-
Put the baking sheet in the preheated oven and bake for about 15-18 minutes, or until the piggies in a blanket are golden brown and the dough is cooked through.
-
Once baked, remove the mini piggies in a blanket from the oven and let them cool slightly before serving.
-
Enjoy your delicious homemade mini piggies in a blanket as a delightful appetizer or snack!
11. Caprese Skewers

Caprese skewers are one of my favorite no-fuss snacks – fresh, flavorful, and so pretty on a plate. I love how the sweet tomatoes, creamy mozzarella, and fragrant basil come together in every bite, and that little drizzle of balsamic glaze just takes it over the top. They’re perfect for parties, picnics, or when I want something light and savory without turning on the oven. Plus, they’re fun to assemble and always make me feel a little fancy!
Servings: 12 skewers
Ingredients:
- 12 cherry tomatoes
- ½ cup mozzarella pearls
- 24 fresh basil leaves
- 1 tbsp balsamic glaze
- ½ tsp black pepper, or to taste
- 12 small skewers or toothpicks
Instructions:
- On a skewer place 2 small pearls of mozzarella.
- Then add a basil leaf. You can fold it double if it’s too big.
- Then add a cherry tomato.
- Then add another basil leaf.
- And add 2 small mozzarella pearls again.
- Repeat until you run out of ingredients.
- Drizzle with balsamic glaze and season with black pepper to taste.
12. Ham & Cheese Sliders

These ham and cheese sliders are a total crowd-pleaser – warm, melty, and packed with flavor thanks to that buttery Dijon glaze on top. I make them all the time for game days, family nights, or when I just want something cozy and easy. The combo of sweet rolls, savory ham, and gooey Swiss cheese is always a hit, and they disappear so fast I’ve learned to make a double batch!
Servings: 12
Ingredients:
- 12 slider buns (like Hawaiian rolls)
- ½ lbs thinly sliced cooked ham
- 12 slices Swiss cheese
- ¼ cup mayonnaise
- 1 tbsp Dijon mustard
- 4 tbsp butter, melted
- 1 tbsp minced onion
- 1 tbsp poppy seeds
Instructions:
-
Preheat your oven to 350°F (175°C).
-
Cut the slider buns in half and place the bottom halves in a baking dish.
-
Spread mayonnaise on the buns, then layer Swiss cheese, ham, and another layer of Swiss cheese on top.
-
Place the top halves of the buns over the fillings to close the sliders.
-
In a bowl, mix together melted butter, Dijon mustard, minced onion, and poppy seeds to make the glaze.
-
Brush the glaze generously over the tops of the sliders, ensuring even coverage.
-
Cover the baking dish with aluminum foil and bake for 15 minutes.
-
Remove the foil and bake for an additional 5–10 minutes, or until the tops are lightly browned and crispy.
-
Let the sliders cool for a few minutes before serving.
13. Greek Layered Dip

This Greek layered dip is one of my favorite go-to snacks when I want something fresh, flavorful, and a little bit fancy without much effort. It’s creamy, crunchy, and loaded with all the Mediterranean goodness I love – hummus, cool Greek yogurt, crisp veggies, salty olives, and tangy feta. I love serving it with pita chips or veggie sticks, and it always feels like a lighter option that still totally hits the spot.
GET THE RECIPE14. Easy Potato Fritters

These easy potato fritters are one of my go-to snacks when I’ve got leftover potatoes and want something crispy, cheesy, and totally satisfying. They’re golden on the outside, soft and flavorful on the inside, and packed with comforting spices and melty cheese. I love how versatile they are, you can switch up the herbs or add a dipping sauce depending on your mood. Honestly, I could eat a whole plate of these for lunch and still go back for more!
Servings: 12
Ingredients:
- 6 – 7 medium potatoes, boiled and peeled (about 2 pounds)
- 1 pound white cheese
- 1/4 cup cornmeal plus 2tbsp for rolling the frittatas
- 4 large egg
- 3tsp oregano
- 1 1/2 tsp smoked paprika
- 2 tablespoons chopped fresh parsley or green onions (optional)
- Salt and pepper to taste
- Vegetable oil, for frying
Instructions:
-
Mash or grate the potatoes.
-
In a large bowl, combine the mashed potatoes, cheese, spices, 2 eggs, cornmeal, and salt to taste. Mix everything well.
-
Form the mixture into 12 balls about the size of tennis balls, then flatten each ball slightly into a patty.
-
Heat about 1/4 inch of vegetable oil in a large skillet over medium heat.
-
When the oil is hot, fry the patties in batches, cooking for 3–4 minutes on each side until golden brown and crispy. Avoid overcrowding the pan.
-
Remove the fritters from the skillet and place them on a plate lined with paper towels to drain excess oil.
-
Serve immediately, garnished with chopped parsley.
-
Optional: Serve with a dipping sauce such as sour cream, garlic aioli, or ketchup.
15. Simple Queso Dip

This simple queso dip is my kind of snack – cheesy, spicy, and ridiculously easy to make. Just toss everything in a dish, let the oven do the work, and you’ve got a warm, melty dip that’s perfect with crunchy tortilla chips. The pepper jack gives it a little kick, the cream cheese makes it extra creamy, and the Rotel adds just the right amount of zing. I always sprinkle on some fresh cilantro at the end for a pop of flavor, and it never lasts long once it hits the table!
GET THE RECIPE16. Crockpot Cranberry BBQ Turkey Sliders

These Crockpot Cranberry BBQ Turkey Sliders are my favorite kind of easy comfort food – sweet, smoky, tangy, and totally irresistible. I love how the slow cooker does all the heavy lifting, making the turkey super tender and flavorful while I go about my day. Once they’re layered onto soft rolls with melty cheddar and that buttery topping, they turn into the ultimate party snack or casual dinner. They’re festive enough for the holidays but simple enough to enjoy anytime!
Servings: 12 sliders
Ingredients:
- 2-3 pound boneless turkey breast
- 1 cup bbq sauce
- 1 cup cranberry sauce
- 1 tablespoon dijon mustard
- 2 tablespoons brown sugar
- 1 teaspoon onion powder
- 1 teaspoon garlic salt
- 1 teaspoon smoked paprika
- ½ teaspoon black pepper
- 12 count slider rolls
- 6 slices cheddar cheese
Topping:
- ½ cup unsalted butter, melted
- 1 teaspoons smoked paprika
- 1 teaspoons packed brown sugar
- ½ teaspoon garlic salt
- ½ teaspoon onion powder
- ¼ teaspoon ground black pepper
- 1 teaspoon dried parsley
Instructions:
-
To your slow cooker, add the turkey.
-
In a bowl, whisk together the BBQ sauce, cranberry sauce, mustard, 2 tablespoons brown sugar, 1 teaspoon onion powder, 1 teaspoon garlic salt, 1 teaspoon smoked paprika, and ½ teaspoon black pepper.
-
Reserve ½ cup of this mixture.
-
Pour the remaining sauce over the turkey breast.
-
Cover and cook on low for 6 hours or high for 4 hours, until the meat shreds easily.
-
Shred the turkey.
-
Preheat your oven to 350°F.
-
Slice your Hawaiian rolls in half.
-
Lay down the cheese slices.
-
Pile the shredded turkey onto the rolls.
-
Top with the reserved sauce.
-
Place the top half of the rolls on.
-
For the topping, mix together ½ cup melted unsalted butter, 1 teaspoon smoked paprika, 1 teaspoon packed brown sugar, ½ teaspoon garlic salt, ½ teaspoon onion powder, ¼ teaspoon ground black pepper, and 1 teaspoon dried parsley.
-
Pour the melted butter mixture all over the top of the rolls.
-
Bake for 15–20 minutes, until golden and melty.
-
Serve!
17. Smoked Salmon Dip

This smoked salmon dip is my go-to when I want something a little fancy without a lot of fuss. It’s rich, creamy, and full of that smoky, briny flavor that pairs perfectly with crunchy crostini or crackers. I love the little bursts of capers and fresh dill in every bite, and it always feels like a treat, even if I’m just making it for myself on a quiet afternoon. It’s the kind of dip that disappears fast at gatherings, so I always keep a little extra tucked away just for me!
GET THE RECIPE18. Sloppy Joe Sliders

These Sloppy Joe Sliders are my kind of comfort food – messy, melty, and packed with flavor. They’ve got all the nostalgic goodness of classic sloppy joes but wrapped up in soft, sweet Hawaiian rolls with gooey cheddar and a buttery glaze on top. I love serving these for casual get-togethers or weeknight dinners when I want something fun and filling. They’re the kind of snack that brings everyone to the table with a smile (and maybe a few napkins)!
Servings: 12 sliders
Ingredients:
- 12 Hawaiian sweet rolls
- 1lb ground beef
- 15-ounce can of Manwich
- 8 slices of cheddar cheese
- 4 tablespoons butter, melted
- 1 Tablespoon brown sugar
- 1 teaspoon Dijon mustard
- 1 teaspoon Worcestershire sauce
- 1 teaspoon sesame seeds
- Chopped parsley, optional for garnish
Instructions:
- Preheat the oven to 350°F and line a baking sheet with parchment paper or a silicone mat.
- In a large skillet over medium-high heat, cook the ground beef until fully browned. Drain any excess grease.
- Reduce the heat to low, stir in the can of Manwich, and let the mixture simmer for about 5 minutes to heat through and blend the flavors.
- While the meat simmers, slice the Hawaiian rolls in half horizontally with a serrated knife, keeping the top and bottom halves intact.
- Place the bottom half of the rolls onto the prepared baking sheet.
- Spread the sloppy joe mixture evenly over the rolls, making sure to cover the entire surface.
- Lay the cheddar cheese slices over the meat.
- Add the top half of the rolls to close the sliders.
- In a small microwave-safe bowl, melt the butter. Stir in the brown sugar, Dijon mustard, and Worcestershire sauce until fully combined.
- Brush the butter mixture evenly over the tops of the rolls.
- Sprinkle sesame seeds over the top.
- Bake uncovered for 20 to 25 minutes, until the tops are golden brown and the cheese is melted.
- Let the sliders cool slightly, then transfer them to a cutting board. Garnish with chopped parsley if desired.
- Slice along the seams to separate into individual sliders and serve warm.
19. Whipped Feta Dip

This whipped feta dip is one of my favorite snacks when I’m craving something creamy, tangy, and full of flavor. It comes together in minutes and feels fancy enough for a dinner party but simple enough for a weekday snack. I love the little kick from the garlic and red pepper flakes, and the lemon juice really brightens it up. It’s perfect with crunchy veggies, pita chips, or even just spread on toast, seriously addictive!
GET THE RECIPE20. Grilled Marinated Pork Skewers with Homemade Aioli

These grilled marinated pork skewers with homemade aioli are one of those snacks that feel like a little backyard feast, even if I’m just making them for myself on a random weekend. The pork is juicy and packed with smoky, herby flavor thanks to that easy marinade, and the homemade aioli? So worth it. Creamy, garlicky, and perfect for dipping, it takes everything to the next level. I love serving these with fresh veggies or piling them on a plate with fries and calling it dinner.
Servings: 4
Ingredients:
Grilled Marinated Pork Skewers:
- 1 lb pork (500 g), shoulder or tenderloin, cut into cubes
- 2 tbsp olive oil
- 2 tbsp soy sauce
- 1 tbsp lemon juice
- 1 tbsp honey
- 2 cloves garlic, minced
- 1 tsp smoked paprika
- 1 tsp dried oregano
- ½ tsp black pepper
- ½ tsp salt
- Wooden or metal skewers
Homemade Aioli:
- 1 egg yolk
- 1 tsp Dijon mustard
- 1 cup olive oil (240 ml) or a mix of olive and neutral oil
- 1 tsp lemon juice
- 1 garlic clove, finely minced or grated
- Salt to taste
Instructions:
-
In a large bowl, combine olive oil, soy sauce, lemon juice, honey, garlic, smoked paprika, oregano, salt, and black pepper to make the marinade.
-
Add the pork cubes to the marinade, ensuring they are well coated. Cover and refrigerate for at least 1 hour, preferably overnight.
-
Soak wooden skewers (if using) in water for 30 minutes to prevent burning.
-
Thread the marinated pork cubes onto the skewers.
-
Preheat the grill to medium-high heat. Grill the skewers for 10–12 minutes, turning occasionally, until the pork is golden brown and cooked through.
-
Serve hot with fresh vegetables, like crunchy radishes, and your favorite dipping sauce or side dishes.
-
In a medium bowl, whisk together the egg yolk and Dijon mustard until smooth.
-
While whisking continuously, slowly drizzle in the oil, starting drop by drop. Once the mixture begins to thicken, pour in the oil in a thin, steady stream.
-
When the mixture reaches a thick, mayonnaise-like consistency, stir in lemon juice and vinegar (if using). Continue whisking.
-
Stir in the minced garlic and season with salt to taste.
-
If the aioli is too thick, thin it out with a teaspoon of water or lemon juice.
-
Let the aioli rest in the fridge for 15–30 minutes to develop its flavors. Serve with fries, seafood, grilled vegetables, or sandwiches.
21. Chicken Parmesan Sliders

These Chicken Parmesan Sliders are everything I love in a snack – crispy chicken, melty cheese, tangy marinara, all tucked into soft, buttery rolls. They’re like a mini version of the classic comfort food, but way easier to serve to a crowd (or keep all to yourself). I always brush the tops with that garlicky Parmesan butter for extra flavor, and they come out of the oven golden, gooey, and totally irresistible. Perfect for game day, parties, or just when I’m in the mood for something cheesy and satisfying!
Servings: 12 sliders
Ingredients:
- 12 Hawaiian sweet rolls
- 20 oz bag chicken tenders
- 1-½ cup marinara sauce
- 8 oz Mozzarella cheese slices
- 4 tablespoons butter, melted
- 2 tablespoons grated Parmesan cheese
- ½ tablespoon Italian seasoning
- 1 teaspoon garlic salt
- Chopped parsley, optional for garnish
Instructions:
- Cook the chicken tenders according to the package instructions, then set them aside.
- Preheat the oven to 350°F.
- Using a serrated knife, slice the Hawaiian rolls in half horizontally, keeping them connected. Place the bottom half in a parchment-lined baking sheet or a lightly greased baking dish.
- Spread a thin layer of marinara sauce over the bottom rolls.
- Arrange the cooked chicken tenders evenly over the marinara, covering the rolls completely.
- Spoon the remaining marinara sauce over the chicken.
- Layer mozzarella cheese slices over the top, then place the top halves of the rolls on.
- Melt the butter in the microwave, then stir in garlic salt, Italian seasoning, and grated Parmesan cheese. Brush the butter mixture evenly over the tops of the rolls.
- Bake for 20 to 25 minutes, or until the tops are golden brown and the cheese is hot and melted.
- Serve sliders warm with extra marinara on the side for dipping.
22. BLT Sliders

These BLT sliders are my favorite way to turn a classic sandwich into a fun, bite-sized snack. They’ve got everything I love – crispy bacon, juicy tomato, creamy mayo, and plenty of shredded lettuce, all piled onto toasted little buns. I like to add the cherry tomato and kale on top with a toothpick when I’m feeling a little extra, but even without the garnish, they’re totally delicious. Perfect for brunches, backyard parties, or honestly, just a casual lunch when I’m craving something simple and satisfying!
Servings: 12 sliders
Ingredients:
- 12 Pack Slider Rolls
- 12 Slices Cooked Thick Bacon, halved
- ¾ Cups Mayonnaise
- 2 Roma Tomatoes, sliced to about ⅛ of an inch
- Shredded Iceberg Lettuce
- 12 Cherry Tomatoes (optional)
- 12 Small Pieces of Kale (optional)
- Toothpicks
Instructions:
- Preheat the oven to 350 degrees fahrenheit.
- Slice the sliders horizontal to separate the tops and bottoms. Toast in the oven for 5-7 minutes or until desired darkness is reached.
- Once the buns are removed from the oven, lay the tops of the buns down and add about 1 tablespoon mayo to the underside of each bun. Alternatively, you can just use a knife and spread it all over the underside if you’re in a hurry. Works just fine both ways.
- Place one slice of tomato on each bottom bun, or more if you’re a tomato lover.
- Add two slices of bacon on top of each of the tomatoes, side-by-side.
- Layer the bottom buns with the shredded lettuce (however much suits your fancy).
- Place the top buns onto the bottom buns.
- If desired, use a toothpick with one cherry tomato and a piece of kale to garnish each sandwich. Gently separate the sandwiches before serving for easier grabbing and enjoy!
23. Ranch Dip

This ranch dip is as easy as it gets, and it’s always a hit no matter the occasion. Just two ingredients and a quick stir, and you’ve got a creamy, tangy dip that pairs perfectly with everything from chips to carrot sticks. I like to keep some in the fridge for snacking or last-minute guests, it’s that simple and that good. Sometimes the easiest things really are the tastiest!
GET THE RECIPE24. Crockpot Spinach & Artichoke Dip

This Crockpot Spinach & Artichoke Dip is one of my go-to snacks when I want something warm, creamy, and downright irresistible. I love tossing everything into the slow cooker and letting it do its thing while I get on with the rest of the day. The mix of gooey cheese, tender artichokes, and fresh spinach makes it feel like a little indulgent treat, and it’s always a hit with a pile of crackers or warm bread on the side. Honestly, I could eat this straight from the spoon, no judgment, right?
GET THE RECIPE25. Creamy Goat Cheese Dip

This creamy goat cheese dip is one of those snacks that feels fancy but is secretly super easy to make. It’s warm, tangy, and herby with just the right touch of garlic and a hint of sweetness if you want it. I love topping it with chopped nuts for a little crunch and serving it with crackers or crusty bread, sun-dried tomatoes on the side make it even better. It’s perfect for a cozy night in or when I want to impress guests without breaking a sweat!
Servings: 4-6
Ingredients:
- 8 oz soft goat cheese
- 3.5 oz (about ½ cup) cream cheese
- 1.75 oz (about ¼ cup) sour cream or Greek yogurt
- 1 garlic clove, minced
- 1 tbsp olive oil
- 1 tsp fresh rosemary or thyme (or ½ tsp dried)
- Salt and pepper to taste
- 1 tsp honey (optional, for slight sweetness)
- 2-3 tbsp nuts (e.g., walnuts or pecans), for garnish
- Croutons, crackers, and sun-dried tomatoes for serving
Instructions:
- Preheat the oven to 350°F.
- In a bowl, mix the goat cheese, cream cheese, and sour cream until smooth. Add the minced garlic, olive oil, rosemary/thyme, salt, and pepper. If you prefer a touch of sweetness, stir in 1 teaspoon of honey.
- Transfer the mixture to a lightly greased small baking dish.
- Bake for 15-20 minutes, until the top is slightly golden and creamy.
- Remove from the oven, sprinkle with nuts, and drizzle with honey if desired.
- Serve hot with toasted baguette slices, crackers, or sun-dried tomatoes.
26. Baked Brie with Garlic and Honey

Baked Brie with garlic and honey is my go-to when I want something simple but totally wow-worthy. The gooey, melty cheese paired with sweet honey and garlicky goodness is just next-level delicious. I love tucking little garlic slices into the top so every bite is bursting with flavor, and if I have rosemary on hand, that goes on too for a cozy, herby touch. Serve it up with crackers or warm baguette slices, and you’ve got a snack that feels fancy without the fuss.
Servings: 4
Ingredients:
- 1 wheel of Brie cheese (8 ounces)
- 3-4 cloves of garlic, thinly sliced
- 2 tablespoons honey
- 1 tablespoon olive oil
- Fresh rosemary sprigs (optional)
- Sliced baguette or crackers, for serving
Instructions:
- Preheat your oven to 350°F (175°C).
- Place the Brie wheel on a baking sheet lined with parchment paper or in a Brie baker if you have one.
- Using a small knife, make small slits on the top of the Brie. Insert the garlic slices into the slits, distributing them evenly across the cheese.
- Drizzle the honey over the top of the Brie, allowing it to seep into the slits and around the cheese.
- Drizzle the olive oil over the Brie as well, to enhance the flavors and help with the baking process.
- If desired, place a few fresh rosemary sprigs on top of the Brie to add an aromatic touch.
- Transfer the baking sheet or Brie baker to the preheated oven and bake for about 15-20 minutes, or until the Brie is soft and gooey in the center.
- Keep an eye on the Brie as it bakes to ensure it doesn’t melt completely and lose its shape.
- Once baked, carefully remove the Brie from the oven and allow it to cool slightly before serving.
- Serve the baked Brie with sliced baguette or crackers. Guests can scoop out portions of the warm, gooey cheese and enjoy the wonderful combination of flavors from the garlic and honey.
27. Classic Grilled Hot Dogs

There’s just something about classic grilled hot dogs that never gets old. They’re simple, nostalgic, and always hit the spot, especially when you’ve got a grill going and a toppings bar ready to go. I love giving mine a little char and toasting the buns for that extra crunch. Whether you’re loading them up with cheese and pickles or keeping it simple with mustard, they’re the kind of snack that brings everyone together and makes any gathering feel like a summer party.
Servings: 8
Ingredients:
- 8 hot dogs (beef, pork, turkey, or your choice)
- 8 classic hot dog buns
- Ketchup
- Mustard
- Mayonnaise (optional)
Toppings (choose a selection based on preference):
- 1 cup shredded cheddar cheese
- 6-8 small, pickled gherkins
- ½ cup chopped onions (raw or grilled)
- ¾ cup diced tomatoes
- Fresh herbs (such as cilantro or chives)
Instructions:
28. Avocado Egg Salad Toast

Avocado egg salad toast is one of my favorite quick snacks when I want something creamy, flavorful, and a little more filling than your average bite. The combo of rich avocado, tangy mustard, and smoky paprika gives it such a nice kick, and it’s all piled on top of crispy toast, what’s not to love? I make this when I’ve got leftover boiled eggs in the fridge and want something that feels fresh but still cozy. Perfect for a lazy lunch or an afternoon pick-me-up!
Servings: 4
Ingredients:
- 4 hard-boiled eggs, peeled and chopped
- 1 ripe avocado
- 1 teaspoon Dijon mustard
- 1 tablespoon lemon or lime juice
- ½ teaspoon kosher salt
- ¼ teaspoon ground pepper
- ½ teaspoon smoked paprika
- 4 slices of your favorite wholemeal bread (whole grain, sourdough, or gluten-free)
Instructions:
-
Peel and chop the hard-boiled eggs into small pieces.
-
Cut the avocado in half, remove the pit, and scoop the flesh into a mixing bowl.
-
Using a fork, mash the avocado to your desired consistency, either smooth or slightly chunky.
-
Mix in the lemon or lime juice to help keep the avocado from browning.
-
Add the chopped eggs to the mashed avocado and stir in Dijon mustard for extra creaminess.
-
Gently mix everything together and season with salt, pepper, and smoked paprika to taste.
-
Toast the slices of bread until golden and crispy.
-
Spread a generous amount of the avocado egg salad mixture over each slice of toast.
-
Enjoy immediately while the toast is still warm and crispy.
29. Asian Sticky Wings

These Asian sticky wings are the kind of snack that makes you want to lick your fingers clean, they’re sweet, savory, garlicky, and totally addictive. I love how the marinade soaks into the wings, then gets cooked down into that glossy, sticky sauce that clings to every bite. The sesame seeds and scallions on top add the perfect finishing touch. These are always a huge hit at parties, but I’ve been known to make a batch just for myself and call it dinner!
Servings: 8
Ingredients:
- 4 lbs (2 kg) chicken wings, separated into drumettes and wingettes
- 1/2 cup soy sauce
- 1/4 cup honey
- 3 tablespoons brown sugar
- 3 tablespoons rice vinegar
- 3 tablespoons oyster sauce
- 3 tablespoons hoisin sauce
- 1/4 cup sesame oil
- 6 cloves garlic, minced
- 2-inch piece of ginger, grated
- 2 teaspoons Chinese five-spice powder
- 1/2 cup water
- 2 tablespoons cornstarch mixed with 4 tablespoons water (to thicken sauce)
- 2 tablespoons sesame seeds, toasted
- 1 scallion, finely sliced
Instructions:
-
In a large bowl, whisk together the soy sauce, honey, brown sugar, rice vinegar, oyster sauce, hoisin sauce, sesame oil, minced garlic, grated ginger, and Chinese five-spice powder until well combined.
-
Add the chicken wings to the marinade, making sure each one is fully coated. Cover the bowl with plastic wrap and refrigerate for at least 1 hour or overnight for best flavor.
-
Preheat your oven to 400°F (200°C). Line two baking sheets with foil or parchment paper and place wire racks on top.
-
Arrange the marinated wings in a single layer on the wire racks. Set aside the leftover marinade. Bake the wings for 35–40 minutes, flipping them halfway through, until golden and slightly charred.
-
While the wings are baking, pour the reserved marinade into a large saucepan with 1/2 cup of water. Bring to a boil over medium heat, then reduce to a simmer for 5–7 minutes. Stir in the cornstarch slurry and cook for another 2–3 minutes until thick and sticky.
-
Once the wings are done, transfer them to a large mixing bowl. Pour the thickened sauce over the wings and toss until evenly coated.
-
Place the coated wings on a serving platter and garnish with toasted sesame seeds and sliced scallions.
-
Serve hot as an appetizer or main dish with rice, salad, or your favorite sides.
30. BBQ Chicken Flatbread

This BBQ chicken flatbread is one of those snacks that feels like a treat but comes together in no time. It’s saucy, cheesy, and loaded with flavor from the smoky chicken, melty cheese, and a little crunch from the red onion. I love how customizable it is, sometimes I throw on sweet peppers, other times I just keep it simple. A little fresh cilantro on top and maybe a dollop of sour cream? Pure snack heaven.
Servings: 2
Ingredients:
For the base:
- 2 flatbreads (lavash, pita, or pre-made pizza crust)
For the topping:
- 200 g cooked or roasted chicken (shredded)
- 4-5 tbsp your favorite BBQ sauce
- 100 g shredded mozzarella cheese (or a mix of cheddar and mozzarella)
- 1 small red onion (thinly sliced)
- 1 small sweet pepper (thinly sliced, optional)
- 1-2 tbsp chopped fresh cilantro or parsley (for garnish)
For serving (optional):
- Sour cream or Greek yogurt
- Lime wedges
Instructions:
-
Preheat your oven to 200°C (390°F). If you’re using a pre-made pizza base, check the package for any specific instructions.
-
Line a baking sheet with parchment paper and place the flatbreads on it.
-
In a bowl, mix the shredded chicken with 3 tablespoons of BBQ sauce and let it sit for about 5 minutes to soak up the flavor.
-
Spread a thin layer of BBQ sauce (about 1 tablespoon per flatbread) over each flatbread.
-
Evenly distribute the BBQ chicken over the flatbreads.
-
Sprinkle the shredded cheese over the top.
-
Add sliced red onion and sweet pepper, if using.
-
Bake the flatbreads in the oven for 10–12 minutes, or until the cheese is melted and starting to brown, and the edges are crispy.
-
Remove the flatbreads from the oven and let them cool slightly.
-
Garnish with fresh cilantro or parsley.
-
If you like, serve with a dollop of sour cream or Greek yogurt and a wedge of lime on the side.
31. Corn Dogs

Corn dogs instantly take me back to summer fairs and carefree weekends, they’re crispy, golden, and just plain fun to eat. I love making them at home when I’m in the mood for something nostalgic and a little indulgent. The cornmeal batter gets perfectly crunchy, and that warm, juicy hot dog inside is just so satisfying. Dip them in mustard, ketchup, or both (no judgment here), and you’ve got a snack that’s guaranteed to bring smiles.
Servings: 6
Ingredients:
- 6 hot dogs
- 6 wooden skewers or sticks
- 3/4 cup yellow cornmeal
- 3/4 cup all-purpose flour
- 1/4 teaspoon salt
- 1/4 teaspoon baking powder
- 1/8 teaspoon baking soda
- 1 tablespoon granulated sugar
- 1 large egg
- 3/4 cup buttermilk (or you can use regular milk with a tablespoon of vinegar or lemon juice added)
- Vegetable oil, for frying
Instructions:
-
Dry the hot dogs with paper towels. Skewer the hot dogs with wooden sticks, ensuring they are centered and the stick goes about halfway up the hot dog.
-
In a large bowl, whisk together the cornmeal, flour, salt, baking powder, baking soda, and sugar. In a separate bowl, beat the egg and then mix in the buttermilk. Pour the wet ingredients into the dry ingredients and stir until just combined. The batter should be thick enough to coat the hot dogs well. If it’s too thick, add a little more buttermilk.
-
Pour vegetable oil into a deep fryer or large pot, ensuring there’s enough oil to completely submerge the corn dogs. Heat the oil to 350°F (175°C). Use a thermometer to check the temperature.
-
Pour the batter into a tall glass for easier dipping. Dip each skewered hot dog into the batter, ensuring it is fully coated. Let the excess batter drip off briefly, then carefully lower it into the hot oil. Fry the corn dogs in batches if necessary to avoid overcrowding, for about 2-3 minutes or until golden brown and crispy.
-
Once cooked, remove the corn dogs from the oil using a slotted spoon and drain them on paper towels to remove excess oil.
-
Serve the corn dogs hot with your favorite condiments like ketchup, mustard, or mayonnaise.
32. Crispy Falafel Wrap with Tzatziki

This crispy falafel wrap with tzatziki is one of my favorite feel-good snacks, it’s fresh, flavorful, and super satisfying. The falafel is golden and crunchy on the outside, soft on the inside, and packed with herbs and spices. I love piling it into a warm flatbread with cool, creamy tzatziki, crunchy pickled veggies, and a handful of greens. It’s the kind of snack that tastes just as good as it looks, and it always hits the spot when I’m craving something savory and a little bit wholesome.
Servings: 4 wraps
Ingredients:
For the Falafel:
- 1 ½ cups cooked chickpeas (from a can or home cooked)
- ½ small red onion, chopped
- 2 cloves garlic, minced
- ¼ cup fresh parsley, chopped
- ¼ cup fresh cilantro, chopped
- 1 tsp ground cumin
- ½ tsp smoked paprika
- ½ tsp baking soda
- 2 tbsp all-purpose flour
- Salt & black pepper, to taste
- 2 tbsp olive oil
For the Tzatziki:
- ½ cup Greek yogurt
- ½ small cucumber, grated & squeezed dry
- 1 clove garlic, minced
- 1 tbsp fresh lemon juice
- 1 tbsp olive oil
- 1 tbsp fresh dill finely chopped
- Salt & black pepper, to taste
For Assembly:
- 4 large flatbreads/pita wraps
- ½ cup pickled onions
- ½ cup pickled radishes
- ½ cup shredded lettuce or baby greens
- ½ cup cherry tomatoes, halved
- ¼ cup crumbled feta cheese (optional)
- Fresh herbs to garnish
Instructions:
-
Add the cooked chickpeas, onion, garlic, herbs, cumin, paprika, baking soda, flour, salt, and pepper to a food processor. Pulse until the mixture is well combined but still a little chunky. Chill in the fridge for 15 minutes to help it hold together.
-
Shape the mixture into small round patties about 1.5 inches wide. Heat olive oil in a pan over medium heat, then cook the falafel for 3–4 minutes on each side until they’re golden and crispy. Transfer to a plate lined with paper towel to drain.
-
In a bowl, mix together the Greek yogurt, grated cucumber, garlic, lemon juice, olive oil, and herbs to make the tzatziki. Season with salt and pepper to taste.
-
Warm the flatbreads slightly to make them more flexible.
-
Spread a generous spoonful of tzatziki onto each flatbread.
-
Layer on the falafel, followed by shredded lettuce or greens, cherry tomatoes, pickled onions, radishes, and crumbled feta.
-
Sprinkle with fresh herbs and add an extra drizzle of tzatziki if you like.
-
Wrap or fold the flatbreads, depending on their size and shape, and serve right away.
33. Mini Cuban Sandwiches

These mini Cuban sandwiches are one of my go-to snacks when I want something warm, melty, and packed with bold flavors. The combo of tender pork, salty ham, gooey cheese, and tangy pickles all pressed between crispy, golden bread is just unbeatable. I love how the mustard and mayo soak into the bread a bit while it grills, giving it that perfectly toasty, flavorful bite. They’re quick to make, super satisfying, and always a hit whenever I serve them!
Servings: 4
Ingredients:
- 4 pieces Cuban bread or baguette slices
- 7 oz cooked pork or beef, thinly sliced
- 3 oz ham, thinly sliced
- 3 oz Edam or Gruyère cheese (or another melting cheese), sliced
- 4-6 pickle slices, thinly sliced
- 2 tbsp mustard (yellow or Dijon)
- 2 tbsp mayonnaise
- 1 tbsp olive oil
- Salt and pepper to taste
Instructions:
-
Spread mayonnaise on one side of each slice of bread and mustard on the other.
-
On one half of the bread, layer the cooked pork, followed by ham, cheese, and pickles.
-
Close the sandwich, making sure the mayo and mustard sides are facing outward.
-
Lightly brush the outside of the sandwich with olive oil to help prevent burning while grilling.
-
Preheat your grill to medium heat.
-
Place the sandwich on the grill and close the lid.
-
Grill for 3–4 minutes per side, or until the bread is golden brown and crispy and the cheese is melted.
-
If needed, press the sandwich down with a grill press or a heavy pan for even cooking.
-
Slice and serve the Cuban sandwiches hot for the best flavor and presentation.
34. Everything Bagel Cucumber Rolls with Smoked Salmon

These everything bagel cucumber rolls with smoked salmon are such a fun little snack – light, fresh, and packed with flavor. I love the crunch of the cucumber paired with creamy cream cheese, salty smoked salmon, and that punchy everything bagel seasoning on top. They look super fancy but are actually really easy to make, which makes them perfect for brunch, parties, or just when I want something a little more exciting than chips and dip.
Servings: 4-6
Ingredients:
- 1 English cucumber
- 4 ounces cream cheese, softened
- 1 tablespoon fresh dill, chopped (optional)
- Everything bagel seasoning
- 4 ounces smoked salmon, thinly sliced
Instructions:
-
Prepare all your ingredients before getting started.
-
Using a mandoline or vegetable peeler, slice the cucumber lengthwise into thin strips.
-
Lay the cucumber slices slightly overlapping on a flat surface, then pat them dry with paper towels.
-
Spread a layer of cream cheese evenly over the cucumber slices.
-
Sprinkle everything bagel seasoning generously over the cream cheese.
-
Place slices of smoked salmon on top of the seasoned cream cheese.
-
Carefully roll the cucumber slices into a tight log, then gently slice into bite-sized rolls.
-
Refrigerate the rolls for at least 30 minutes to let the flavors blend.
-
Before serving, arrange the bite-sized cucumber rolls on a platter and enjoy!
35. Loaded Tater Tots

Loaded tater tots are my kind of snack – crispy, cheesy, bacon-covered, and totally over the top in the best way. I love piling them high with warm queso, crunchy bacon bits, a drizzle of ranch, and a handful of scallions for that little pop of freshness. They’re the kind of thing I whip up when I want something indulgent and fun, perfect for movie nights, game days, or just because it’s been one of those weeks.
Servings: 4-6
Ingredients:
- 1 package of frozen tater tots (about 32 oz)
- 8 slices of bacon, chopped
- 1 cup queso
- 1/2 cup ranch dressing
- 2 scallions, thinly sliced
- Salt and pepper to taste
Instructions:
-
Preheat your oven to 425°F (220°C), or follow the temperature listed on your tater tot package if it differs.
-
Spread the tater tots in a single layer on a baking sheet.
-
On a separate baking sheet, arrange the bacon slices in a single layer.
-
Place both baking sheets in the oven. Bake the tater tots for 20–25 minutes, or until golden and crispy.
-
Bake the bacon for 15–20 minutes, checking around the 12-minute mark to prevent overcooking. Remove once crispy and let cool slightly, then chop into pieces.
-
While everything is baking, slice the scallions and warm the queso in a microwave-safe bowl or on the stovetop until smooth and pourable, about 2–3 minutes.
-
Transfer the baked tater tots to a large serving dish.
-
Drizzle the warm queso evenly over the tater tots.
-
Sprinkle the chopped bacon on top.
-
Drizzle ranch dressing over the bacon and tots.
-
Garnish with sliced scallions.
-
Finish with a light sprinkle of salt and pepper, then serve immediately while hot and melty.
36. Mini Caprese Pizzas

These mini Caprese pizzas are such a fun little twist on a classic favorite, they’ve got all the fresh flavors of a Caprese salad, but with a warm, cheesy, pizza-style upgrade. I love using mini naan for the base because it gets nice and crispy, and the combo of gooey mozzarella, juicy tomatoes, and that sweet balsamic glaze on top is just chef’s kiss. They’re perfect for parties, quick lunches, or whenever I want something that feels fancy without a lot of fuss.
Servings: 6 mini pizzas
Ingredients:
- 6 mini naan rounds
- ½ cup pizza sauce or marinara
- ½ cup shredded mozzarella
- ¼ cup cherry tomatoes
- ¼ cup arugula
- 3-4 basil leaves
- 1 tbsp balsamic glaze
- ½ tsp black pepper
Instructions:
-
Preheat your oven to 350°F.
-
Slice the cherry tomatoes and set them aside.
-
Stack the basil leaves, roll them up, and slice them thinly.
-
Arrange the mini naan rounds on a baking sheet and spread pizza sauce evenly over each one.
-
Sprinkle shredded cheese on top, followed by the cherry tomatoes and sliced basil.
-
Season with a little black pepper.
-
Bake in the preheated oven for 15–20 minutes, or until the cheese is melted and the edges are golden and crisp to your liking.
-
Remove from the oven and top with a drizzle of balsamic glaze and a handful of fresh arugula.
-
Serve and enjoy!
37. Mini Salmon Quiches

These mini salmon quiches are one of my favorite savory bites to whip up when I want something a little fancy but still totally approachable. They’ve got a buttery crust, a creamy filling, and that smoky salmon flavor that just feels extra special. I love serving these at brunches or as an easy make-ahead snack, they disappear fast! A little sprinkle of dill on top makes them look just as good as they taste.
Servings: 12 mini quiches
Ingredients:
For the Crust:
- 1 cup all-purpose flour
- 1/4 cup unsalted butter, chilled and cubed
- 2-3 tablespoons ice cold water
- Pinch of salt
For the Filling:
- 1/2 cup smoked salmon, chopped
- 1/2 cup grated cheddar or Gruyere cheese
- 4 medium eggs
- 1/2 cup heavy cream
- Salt and pepper to taste
- Chopped dill to garnish
Instructions:
-
Preheat your oven to 350°F (175°C) and grease and flour a mini muffin tin.
-
In a mixing bowl, combine the flour and salt. Add the cubed butter and mix gently until the texture resembles coarse crumbs.
-
Slowly add the ice-cold water, one tablespoon at a time, mixing just until the dough comes together.
-
Roll out the dough on a floured surface and cut into small circles to fit your mini muffin tin.
-
Press the dough circles into the muffin tin cups to form mini crusts, then prick the bottoms with a fork to prevent them from puffing. Place the tin in the fridge while you make the filling.
-
In another bowl, whisk together the eggs, cream, salt, and pepper until fully combined.
-
Add a small amount of chopped salmon and grated cheese into each prepared crust.
-
Pour the egg mixture over the salmon and cheese, filling each crust almost to the top.
-
Bake the mini quiches for 15–20 minutes, or until the tops are slightly golden and the filling is set.
-
Let the quiches cool for a few minutes, then gently remove them from the tin.
-
Garnish with chopped dill and serve.
38. Pumpkin Feta Phyllo Cups

These pumpkin feta phyllo cups are such a delightful little snack that feels fancy but comes together pretty easily. I love the combo of sweet, tender pumpkin with salty feta and a bit of fresh spinach, all wrapped up in crispy, buttery phyllo. They’re perfect for fall get-togethers or whenever I want something bite-sized that’s packed with flavor. Plus, the pumpkin seeds on top add a nice crunch that keeps you coming back for more!
Servings: 12
Ingredients:
- 6 sheets of phyllo dough
- 200 g pumpkin, peeled and cut into small cubes
- 100 g feta cheese, crumbled
- 1 cup baby spinach, finely chopped
- 2 tbsp olive oil
- Salt and pepper to taste
- 1 tbsp honey (optional)
- 2-3 tbsp melted butter (for brushing the phyllo dough)
- Pumpkin seeds or sesame seeds for garnish (optional)
Instructions:
-
Preheat your oven to 180°C (350°F).
-
Heat 1 tablespoon of olive oil in a skillet, then sauté the pumpkin cubes for 5–7 minutes until tender. Season with salt, pepper, and a drizzle of honey if using.
-
Add the baby spinach to the pan and cook for 1–2 more minutes, just until wilted. Turn off the heat and stir in the crumbled feta cheese. Gently mix everything together to create the filling.
-
Cut the phyllo dough into 10×10 cm squares. Brush each square lightly with melted butter.
-
Stack three buttered squares on top of each other, rotating each one slightly to create a star shape. Press the stacks into a muffin tin to form phyllo cups.
-
Spoon the pumpkin, spinach, and feta filling into each phyllo cup.
-
If you’d like a little extra crunch, sprinkle pumpkin seeds or sesame seeds on top before baking.
39. Roasted Tomato Burrata Bruschetta

This roasted tomato burrata bruschetta is one of those snacks that feels effortlessly elegant but is so easy to make. The juicy, slightly caramelized tomatoes paired with creamy, dreamy burrata and fresh basil is seriously next-level delicious. I love drizzling balsamic glaze on top for that perfect balance of sweet and tangy, and serving it with crispy baguette slices just ties everything together. It’s the kind of snack that always gets “oohs” and “ahhs” at any gathering, or even just when I want to treat myself!
Servings: 2-4
Ingredients:
- 1 pint cherry tomatoes
- 4 oz burrata cheese ball
- 1 small shallot, finely chopped
- 2 cloves garlic, minced
- 2 tbsp olive oil
- Salt and pepper to taste
- Fresh basil leaves, chopped
For serving:
- 1 baguette, sliced (optional)
- 1 tbsp balsamic glaze
Instructions:
-
Preheat your oven to 375°F (190°C).
-
In a baking dish, combine the cherry tomatoes, chopped shallot, minced garlic, and olive oil. Toss everything together until the tomatoes are well coated.
-
Roast the tomato mixture for 20–25 minutes, or until the tomatoes begin to burst and release their juices. For a little extra color, switch the oven to broil for the last 2–3 minutes to lightly brown the top.
-
Remove the dish from the oven and let it cool for about 5 minutes.
-
Sprinkle chopped fresh basil over the roasted tomatoes, then season with salt and pepper. Gently place the burrata on top.
-
Drizzle with balsamic glaze for a sweet finishing touch.
-
Serve warm or at room temperature with crostinis, crackers, or slices of crusty bread.
40. Rosemary & Sea Salt Focaccia

Making rosemary and sea salt focaccia from scratch is one of those kitchen projects I love because it fills the house with the most amazing smells, and the result is this golden, crispy, herb-studded bread that’s seriously addictive. I love pressing those little dimples into the dough before baking so the olive oil pools just right, and the flaky sea salt on top gives every bite that perfect salty crunch. It’s great on its own, dipped in olive oil and balsamic, or as a base for sandwiches when I want something a little extra special.
Servings: 8-10
Ingredients:
- 4 cups all-purpose flour (500 g)
- 2 ¼ tsp dry yeast (7 g, 1 packet)
- 1 ⅓ cups warm water (325 ml)
- 2 tbsp olive oil (plus extra for drizzling)
- 1 tsp sugar
- 1 tsp salt
- 1 tbsp fresh rosemary leaves (or 1 tsp dried)
- 1 tsp flaky sea salt
Instructions:
-
In a small bowl, combine the warm water, yeast, and sugar. Stir gently and let it sit for 5–10 minutes until it becomes foamy.
-
In a large mixing bowl, whisk together the flour and salt. Add the foamy yeast mixture and olive oil, then knead the dough for 8–10 minutes until it’s smooth and elastic.
-
Shape the dough into a ball, cover it with a clean kitchen towel, and let it rise in a warm spot for 1 to 1.5 hours, or until it has doubled in size.
-
Grease a baking tray with olive oil. Place the risen dough on the tray and stretch it into a rectangle or press it into a round shape, depending on your preference.
-
Use your fingertips to press dimples all over the surface of the dough. Drizzle generously with olive oil and sprinkle with rosemary and flaky sea salt.
-
Let the dough rise again for 30–40 minutes while you preheat the oven to 430°F (220°C).
-
Bake the focaccia for 20–25 minutes, or until it’s golden brown and crispy around the edges.
-
Allow to cool slightly, then slice and serve. It’s perfect with a dip of olive oil and balsamic vinegar or used as a base for sandwiches!
41. Smoked Salmon & Avocado Bruschetta

Smoked salmon and avocado bruschetta is one of those snacks that feels fancy but comes together so quickly, making it perfect for when I want something fresh and satisfying without a lot of fuss. The creamy avocado spread with a hint of lemon pairs beautifully with the silky smoked salmon, and the crispy crostini adds that perfect crunch. I love finishing it off with a sprinkle of fresh dill, it just brings everything to life. It’s a go-to for me when friends drop by or when I want a little treat for myself!
Servings: 4
Ingredients:
- 1/2 French bread, sliced and toasted (crostini)
- 8 oz smoked salmon
- 1 ripe avocado
- 2 tbsp Greek yogurt
- 1 tbsp mayonnaise
- 1/2 lemon, juiced
- Few sprigs of dill
- Salt and pepper to taste
Instructions:
-
Preheat your oven broiler on high.
-
Slice the French bread into 1/2-inch thick pieces and place them on a baking sheet.
-
Position the oven rack about 6 inches below the broiler and broil the bread slices for about 1.5 minutes on each side, or until golden and crispy. Keep a close eye to avoid burning.
-
In a bowl, mash the ripe avocado with a fork until smooth.
-
Stir in the Greek yogurt, mayonnaise, and freshly squeezed lemon juice. Mix until well combined.
-
Season the avocado mixture with salt and pepper to taste.
-
Spread a generous layer of the avocado mixture onto each toasted crostini.
-
Top each one with a slice of smoked salmon, folding it if needed to fit the bread.
-
Finely chop the fresh dill and sprinkle it over the salmon for a bright, herby finish.
42. Spanish Pan Con Tomate

Spanish Pan Con Tomate is one of those simple, beautiful snacks that instantly transports me to a sunny afternoon in Spain. It’s all about fresh, ripe tomatoes grated right onto crispy, garlicky bread, then finished with a drizzle of good olive oil and a sprinkle of basil. The flavors are so bright and comforting, and I love how easy it is to make yet so impressive to serve. Perfect for a light snack or paired with a glass of wine for a little taste of Mediterranean magic at home!
Servings: 8
Ingredients:
- 1 loaf ciabatta bread
- 2-3 garlic cloves, peeled
- 2 ripe medium tomatoes (preferably vine-ripened)
- 4 tablespoons extra virgin olive oil, plus more for brushing
- Sea salt, to taste
- Freshly cracked black pepper, to taste
- Fresh basil, chopped, for garnish
Instructions:
-
Cut the ciabatta loaf in half lengthwise, then into smaller pieces if desired.
-
Brush the cut sides of the bread generously with olive oil.
-
Place the bread cut side up on a baking sheet and broil for 4–5 minutes, until golden brown and slightly charred around the edges.
-
Cut the tops off the tomatoes and discard.
-
Grate the flesh side of the tomatoes on the large holes of a box grater over a bowl, leaving the skins behind. Discard the skins.
-
Pour the grated tomato into a fine-mesh sieve over another bowl and press gently to remove excess liquid.
-
Transfer the thicker tomato pulp to a clean bowl and season with sea salt and freshly cracked black pepper to taste.
-
Once the bread comes out of the broiler and is still warm, rub the cut sides with peeled garlic cloves to your preferred intensity.
-
Spoon the seasoned tomato mixture generously over each slice of garlic-rubbed bread.
-
Drizzle with olive oil and sprinkle with freshly chopped basil.
-
Serve immediately for the best flavor and texture.
43. Spanish Patatas Bravas

Patatas Bravas are one of those snacks I turn to when I want something crispy, spicy, and totally satisfying. I love how the golden potatoes get smothered in that smoky, tangy brava sauce, seriously addictive, and the optional garlic aioli adds the perfect creamy kick to balance it all out. Making these feels like a little trip to Spain right in my own kitchen, and they’re always a hit whether I’m sharing with friends or just indulging solo.
Servings: 4-6
Ingredients:
For the Potatoes:
- 4 medium potatoes (such as Russet or Yukon Gold), peeled and cut into 1-inch cubes
- Vegetable oil for frying
- Salt to taste
For the Brava Sauce:
- 2 tablespoons olive oil
- 1 small onion, finely chopped
- 2 cloves garlic, minced
- 1 teaspoon smoked paprika (sweet or hot)
- 1/4 teaspoon cayenne pepper (optional, for heat)
- 1 teaspoon all-purpose flour
- 2 tablespoons tomato paste
- 1/2 cup chicken or vegetable broth
- 1/2 teaspoon red wine vinegar
- Salt and black pepper to taste
For Garlic Aioli (Optional):
- 1/2 cup mayonnaise
- 1 small garlic clove, finely grated
- 1 teaspoon lemon juice
- Salt to taste
For Garnish:
- Fresh parsley, chopped
Instructions:
-
Rinse the peeled and cubed potatoes in cold water to remove excess starch, then pat them completely dry with a clean kitchen towel.
-
Heat vegetable oil in a deep-frying pan or pot to 350°F (175°C).
-
Fry the potatoes in batches for 6–8 minutes, or until golden and crispy. Transfer with a slotted spoon to a paper towel-lined plate and sprinkle with salt while still warm.
-
In a small saucepan, heat 2 tablespoons of olive oil over medium heat.
-
Add the finely chopped onion and sauté for about 5 minutes until soft and translucent.
-
Stir in the minced garlic, smoked paprika, and cayenne pepper. Cook for about 30 seconds until fragrant.
-
Sprinkle flour over the mixture, stir to coat, and cook for 1 minute to eliminate the raw flour taste.
-
Stir in the tomato paste, then whisk in the chicken or vegetable broth until smooth.
-
Let the sauce simmer for 5–7 minutes, stirring occasionally, until it thickens.
-
Add the red wine vinegar and season with salt and black pepper to taste. Adjust as needed.
-
If desired, blend the sauce with an immersion blender for a smoother texture or leave it slightly chunky.
-
In a small bowl, combine mayonnaise, grated garlic, and lemon juice to make the garlic aioli (optional).
-
Add salt to taste and refrigerate the aioli until ready to use.
-
Arrange the crispy fried potatoes on a serving plate.
-
Drizzle the brava sauce generously over the potatoes.
-
Add dollops of garlic aioli on top or serve it on the side for dipping.
-
Finish with a sprinkle of freshly chopped parsley.
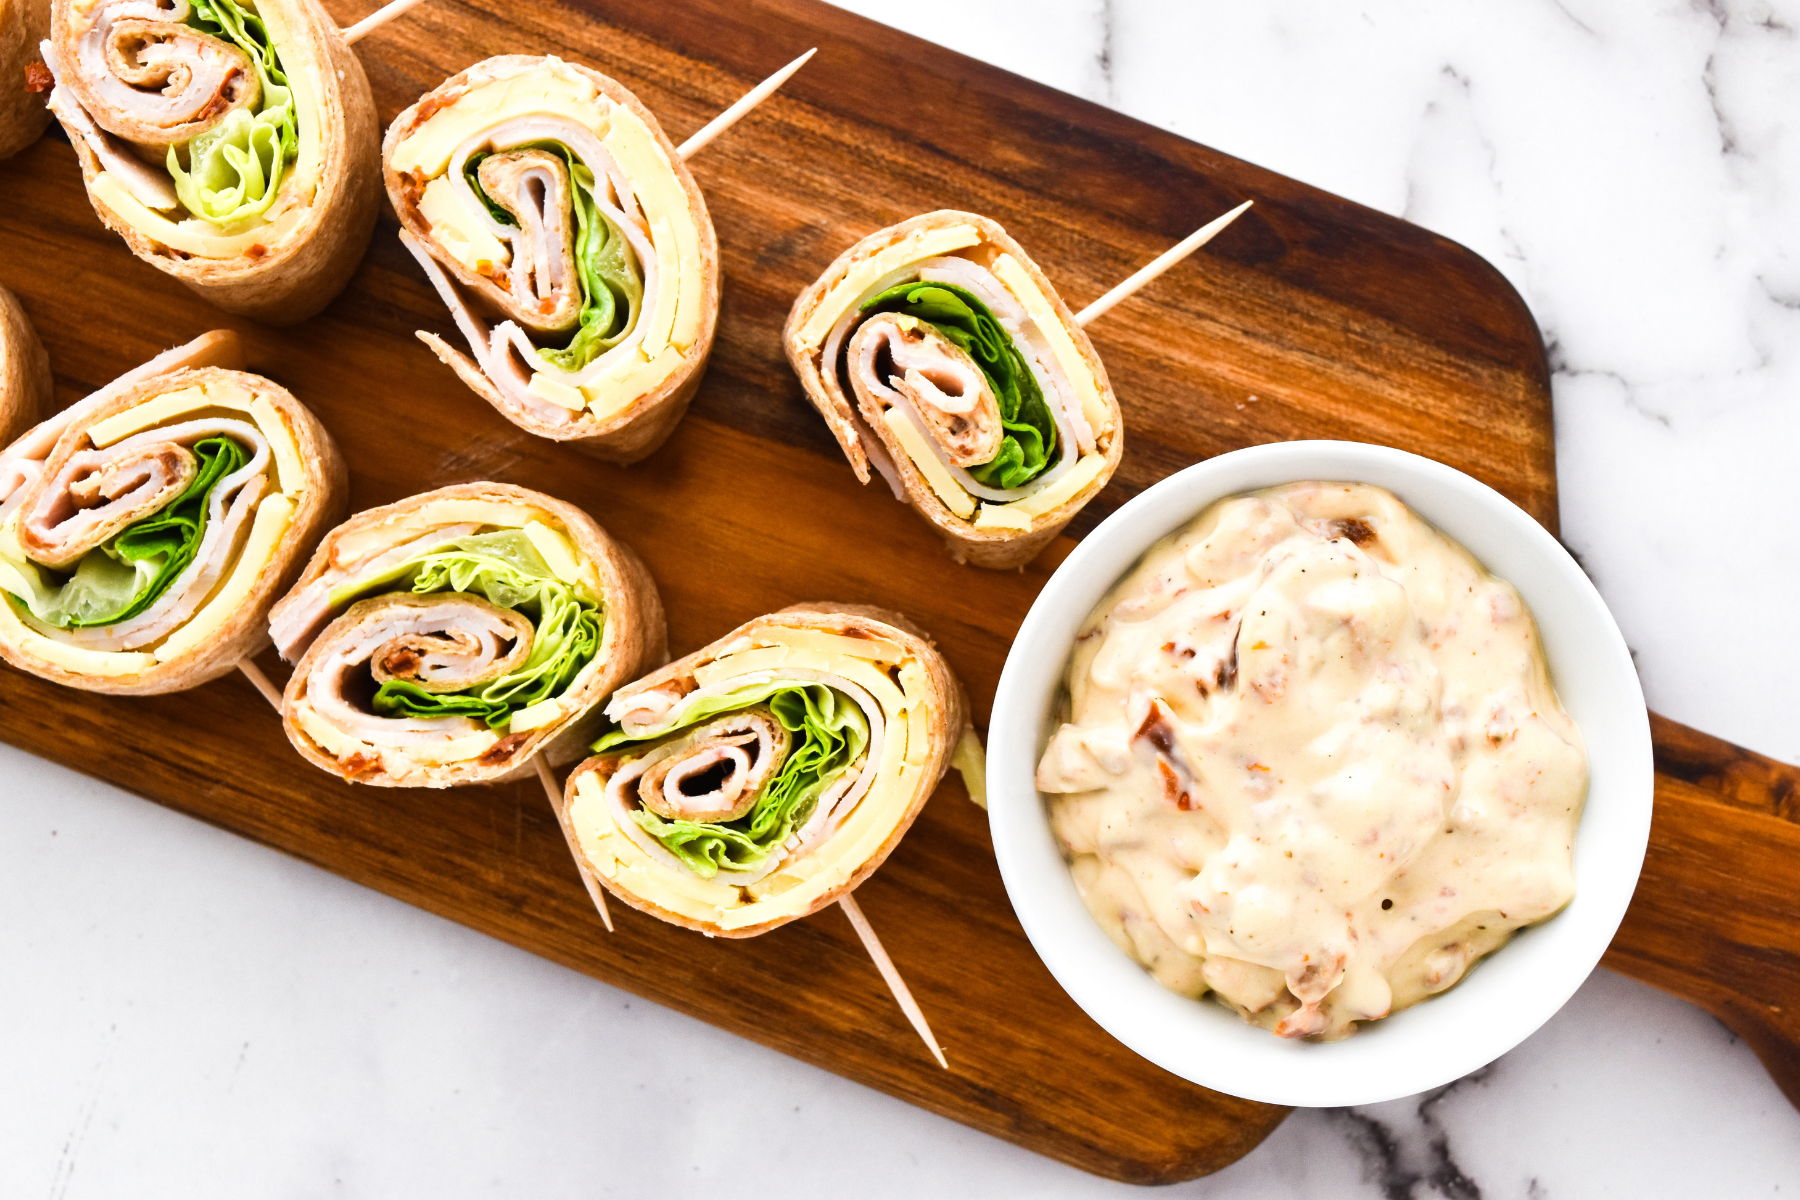
44. Sun-Dried Tomato & Turkey Pinwheels

Sun-dried tomato and turkey pinwheels are one of my favorite easy snacks when I want something fresh, flavorful, and a little bit fancy without any hassle. The creamy, tangy sun-dried tomato spread with a hint of heat from the Tabasco pairs perfectly with the turkey, cheese, and crisp lettuce, all wrapped up in soft tortillas. I love making these ahead of time for parties or quick lunches, they’re as pretty as they are delicious and always disappear fast!
Servings: 12-14 pinwheels
Ingredients:
Sun-Dried Tomato Spread:
- 2 oz cream cheese, at room temperature
- 2 tbsp sun-dried tomatoes in oil, drained and chopped
- 2 tbsp mayonnaise
- 4-5 dashes Tabasco sauce
- kosher salt
- ground black pepper
Pinwheel Sandwiches:
- 2 tortilla wraps, 9 inch
- 150-200 grams sliced turkey breast
- 4-6 leafs of lettuce, boston or butter lettuce
- 6 slices cheese, cheddar, provolone, or monterey jack, or havarti
Instructions:
-
In a small bowl, mix together the cream cheese, sun-dried tomatoes, mayonnaise, and a few dashes of Tabasco sauce until well blended. Season with salt and pepper to taste.
-
Lay the tortillas flat on a clean surface and spread the cream cheese mixture evenly over the entire surface of each one.
-
Place 4–5 slices of turkey on each tortilla, leaving a bit of space at one end to allow for rolling.
-
Add slices of cheese and a layer of lettuce along the center of each tortilla.
-
Roll the tortillas up tightly, starting from the side with the fillings closest to the edge and rolling toward the side with the space.
-
Place the rolled tortillas seam side down in a baking dish or wrap them in plastic wrap. Refrigerate until ready to serve.
-
When ready, slice each roll into 1-inch pieces to create 6–7 pinwheels per tortilla. Secure with a toothpick if desired.
45. Classic Hummus

Classic hummus is one of my all-time favorite snacks because it’s creamy, tangy, and just so satisfying. I love making it from scratch, the fresh lemon juice and garlic give it such a bright kick, and the tahini makes it perfectly smooth and nutty. Drizzling a bit of olive oil on top and sprinkling paprika gives it that little extra something that makes it feel special. It’s perfect for dipping veggies, spreading on sandwiches, or just eating straight with a spoon when no one’s looking!
Servings: 2
Ingredients:
- 3 tbsp lemon juice
- 2 garlic cloves, minced
- 1 tsp salt
- 5 cups cooked chickpeas
- 4 Tbsp ice water, (or to your desired consistency)
- 1/2 cup tahini paste
- 1/2 tsp ground cumin
- 1/4 cup extra virgin olive oil, and more to drizzle
- 1 tsp coriander, finely chopped
- Smoked paprika, to garnish
Instructions:
-
In a food processor or blender, combine the lemon juice, garlic, and salt. Blend until the garlic is finely minced.
-
Add the chickpeas, ice water, tahini, cumin, and olive oil. Blend until the hummus is smooth and creamy.
-
Taste and adjust the seasoning as needed to suit your preference.
-
To serve, drizzle with a little olive oil and garnish with a few reserved chickpeas, chopped parsley, and a dash of paprika.
-
Serve and enjoy your homemade hummus!
With so many delicious savory snacks to choose from, it’s easy to keep your snack game strong no matter the occasion. From crispy bites to cheesy melts and fresh, flavorful dips, these recipes have something for every craving and crowd. I love how versatile and fun savory snacks can be, they’re perfect for sharing with friends, enjoying during a game, or just treating yourself on any random day. Whichever ones you try first, I’m pretty sure they’ll become favorites you keep coming back to.