
Creepy-Cute Halloween Treats You’ll Want to Make This Year
Halloween is hands down one of my favorite times to get creative in the kitchen. There’s just something about whipping up spooky little treats that feel festive but still totally delicious. Whether it’s cookies drizzled with “cobwebs” of icing, truffles dressed up like pumpkins, or brownies that look like they came straight out of a pumpkin patch, I love that mix of creepy and cute. It’s the perfect excuse to have fun with food while still serving up flavors everyone actually wants to eat.
This year, I pulled together a collection of treats that range from no-bake goodies you can throw together in minutes to full-on desserts that’ll wow at any Halloween party. We’re talking everything from Pumpkin Cheesecake Mini Trifles to Zombie Muddy Buddies, plus a few nostalgic nods like Copycat Little Debbie Pumpkin Delights. There’s even Nutter Butter Ghosts and Pumpkin Blondie Mummies that are so adorable, the kids might hesitate to take the first bite (but not for long!).
What I love most about these recipes is that they’re as fun to make as they are to eat. You can get the kids involved in decorating, bring a plate of Halloween Oreos or Candy Bark to a party, or just cozy up with a slice of Chocolate Ganache Pumpkin Pie after trick-or-treating. Whether you’re after something festive for a crowd or just a little seasonal fun at home, these creepy-cute Halloween treats are bound to bring smiles, and maybe a few playful shivers.
1. Blackout Cobweb Cookies
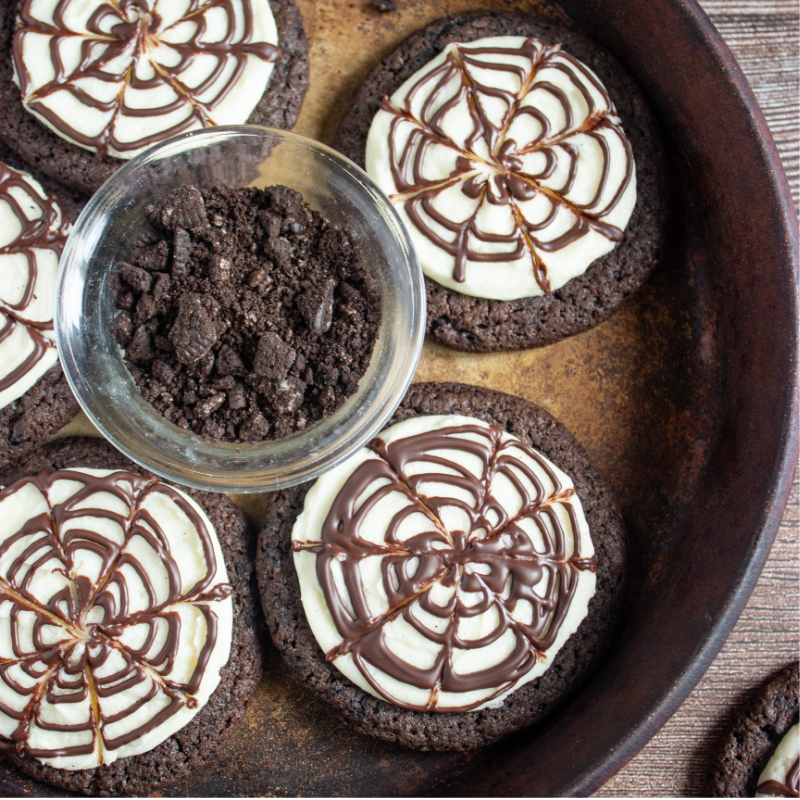
When it comes to Halloween baking, these Blackout Cobweb Cookies might just be the spookiest (and most delicious) thing to come out of my kitchen. They start with an extra-dark, chocolatey cookie dough that gets a little crunch from crushed Oreos, then they’re topped with a swirl of sweet vanilla frosting. The real fun comes with the cobweb design, just a simple drizzle of melted chocolate and a quick swirl with a toothpick turns each cookie into a creepy-cute masterpiece. They’re the kind of treat that looks bakery-level impressive but is surprisingly easy to pull off, which makes them perfect for Halloween parties, school bakes, or just a fun night in.
Want all the details? Head over to the full post for tips, variations, and a printable recipe card!
Servings: 8
Ingredients:
For the Cookie Dough:
- 1 cup unsalted butter, softened
- 1 cup dark brown sugar, packed
- ½ cup granulated sugar
- 2 large eggs
- 2 tsp vanilla extract
- 1 ¾ cups all-purpose flour
- ½ cup cocoa powder
- ½ tsp baking soda
- ½ tsp baking powder
- ¼ tsp salt
- 1 cup crushed Oreo cookies (about 10 cookies, without filling)
- Optional: use black food coloring for an extra black cookie dough.
White Vanilla Frosting:
- ½ cup unsalted butter, softened
- 2 cups powdered sugar
- 2–3 tbsp milk or heavy cream
- 1 ½ tsp vanilla extract
- Pinch of salt
For the Cobweb Chocolate Design:
- ¼ cup dark chocolate chips or chopped dark chocolate
- 1 tsp coconut oil or butter (optional, for smoothness)
Instructions:
For the Cookies:
- Prep: Preheat oven to 350°F (175°C). Line two baking sheets with parchment paper.
- Cream butter & sugar: Beat butter, brown sugar, and granulated sugar until light and fluffy.
- Add eggs & vanilla: Mix in eggs one at a time, then add vanilla.
- Dry ingredients: In a separate bowl, whisk flour, cocoa, baking soda, baking powder, and salt. Add to wet mixture gradually.
- Oreo time: Stir in crushed Oreos.
- Shape cookies: Scoop ¼ cup of dough per cookie. Roll into balls and flatten slightly.
- Bake: Bake for 9–12 minutes until set around the edges but soft in the middle. Let cool completely.
For the White Vanilla Frosting:
- Beat butter until creamy. Add powdered sugar gradually.
- Add vanilla and a tablespoon of milk at a time until thick but spreadable.
- Spread or pipe a generous layer on each cooled cookie.
For the Cobweb Chocolate Design:
- Melt chocolate (and coconut oil, if using) in a microwave-safe bowl in 15–20 second intervals until smooth.
- Transfer to piping bag or small zip bag and snip a tiny corner.
- Pipe tight spirals over the white frosting.
- Create a cobweb effect: Take a toothpick and drag from the center to create a cobweb effect. Wipe the toothpick clean between drags.
2. Chocolate Ganache Pumpkin Pie
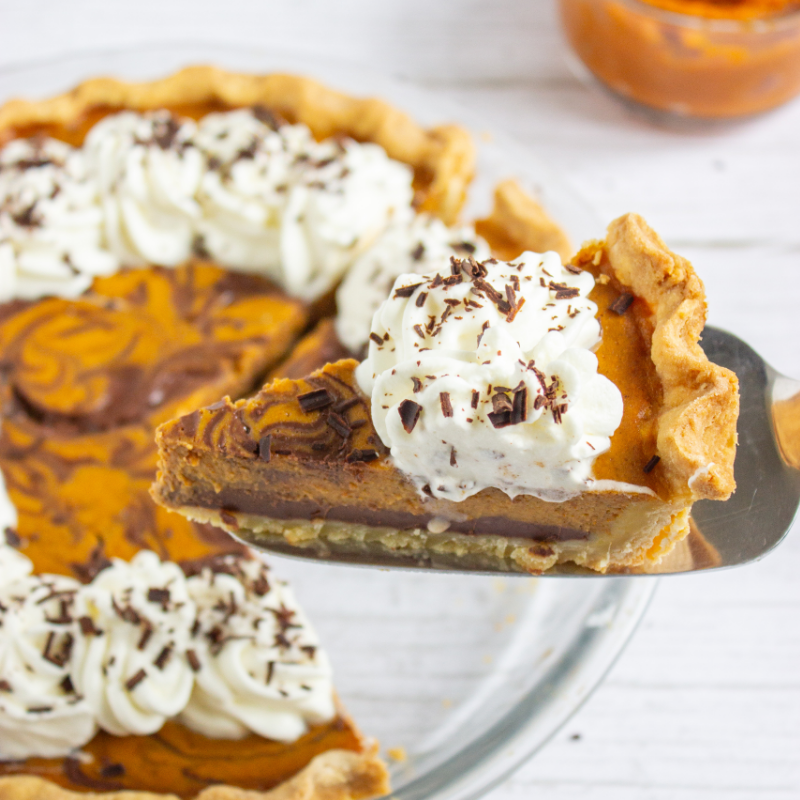
Pumpkin pie is already a fall classic, but this Chocolate Ganache Pumpkin Pie takes it to a whole new level of indulgence. Imagine a buttery homemade crust, a rich layer of silky chocolate ganache tucked at the bottom, and then that creamy, spiced pumpkin filling baked right on top, it’s basically two desserts in one. The chocolate adds just the right amount of decadence without overpowering the warm pumpkin spices, and honestly, every bite feels like a little celebration of fall. This pie is one of those showstoppers that looks fancy enough for a holiday table but is still cozy enough to enjoy with a cup of coffee on a crisp October afternoon.
Want all the details? Head over to the full post for tips, variations, and a printable recipe card!
Servings: 8
Ingredients:
For the Homemade Butter Pie Crust:
- 1 1/4 cups all-purpose flour
- 1/2 tsp salt
- 1/2 tsp sugar (optional)
- 1/2 cup cold unsalted butter, cut into cubes
- 1 egg yolk
- 2–3 tbsp ice water
For the Chocolate Ganache Layer:
- 1/3 cup heavy cream
- 4 oz bittersweet or semisweet chocolate, finely chopped
- 1/2 tbsp unsalted butter
- Pinch of flaky salt (optional)
For the Pumpkin Filling:
- 1 1/4 cups pumpkin purée
- 2 large eggs
- 1/3 cup light brown sugar, packed
- 1 tbsp maple syrup
- 1/2 tsp ground cinnamon
- 1/4 tsp ground ginger
- 1/4 tsp fine salt
- 3/4 cup half-and-half (or 1/2 cup heavy cream + 1/4 cup milk)
Instructions:
1. Make the Pie Dough
- In the bowl of a food processor, pulse together the flour, salt, and sugar.
- Cut in the cold butter using the food processor or your fingers until the mixture is crumbly with some pea-sized bits.
- Add the egg yolk and ice water, 1 tablespoon at a time, until the dough just holds together when pinched.
- Form the dough into a flat disk, wrap tightly, and refrigerate for at least 1 hour (or up to 2 days).
2. Roll Out & Blind Bake
- Preheat the oven to 375°F (190°C).
- Roll out the chilled dough on a floured surface into a 12-inch circle and fit it into a 9-inch pie dish.
- Trim and crimp the edges, then chill again for 15 minutes.
- Prick the bottom of the crust with a fork, line it with parchment paper, and fill with pie weights or dry beans.
- Bake for 15 minutes, then remove the parchment and weights.
- Bake for another 5–7 minutes, until the crust is lightly golden. Let cool slightly.
3. Make the Ganache Layer
- Heat the cream in a small saucepan until steaming, but not boiling.
- Pour over the chopped chocolate and butter in a heatproof bowl. Let sit for 1 minute, then stir until smooth.
- Add a pinch of flaky salt, if using.
- Spread the ganache evenly over the bottom of the baked crust and chill for 10–15 minutes to set.
4. Make the Pumpkin Filling
- In a large bowl, whisk together the pumpkin purée, eggs, brown sugar, maple syrup, cinnamon, ginger, and salt.
- Whisk in the half-and-half (or cream and milk) until smooth and well combined.
5. Assemble and Bake
- Preheat the oven to 350°F (175°C).
- Gently pour the pumpkin filling over the chilled ganache layer. (Optional: swirl in a bit of reserved ganache for a marbled look.)
- Bake for 45–55 minutes, or until the filling is mostly set with a slight jiggle in the center.
- Let the pie cool completely at room temperature, then refrigerate for at least 2 hours (or overnight) before slicing.
3. Copycat Little Debbie Pumpkin Delights
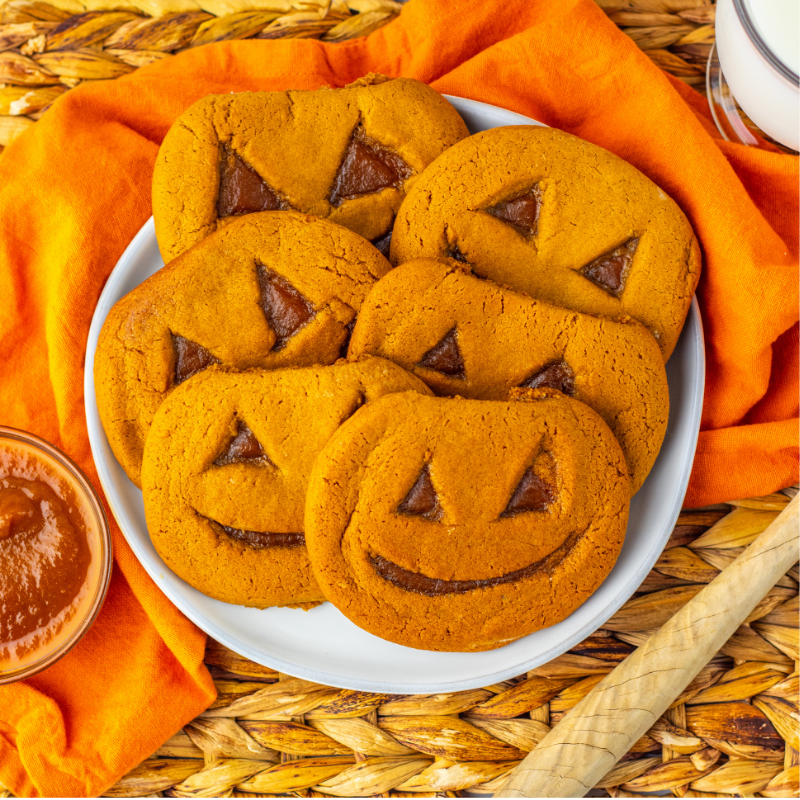
These copycat Little Debbie pumpkin delights instantly take me back to childhood, when opening a lunchbox and finding one of those soft, spiced pumpkin cookies with the little jack-o’-lantern face felt like the best surprise ever. Making them at home is even more fun because you get all that nostalgic flavor with the bonus of fresh, cozy pumpkin filling baked right in. They’ve got that perfect balance of soft molasses cookie and sweet pumpkin spice center, and cutting out the little faces is such a cute, festive touch. Honestly, they’re as fun to make as they are to eat, and they always get a big smile from anyone who tries them.
Want all the details? Head over to the full post for tips, variations, and a printable recipe card!
Servings: 8
Ingredients:
- 15 oz of canned pure pumpkin
- 1 1/2 cup sugar
- 2 tsp pumpkin pie spice
- 2 tsp cinnamon
- 1 tsp cornstarch
- 3/4 cup of apple juice
- 12 tbsp of butter (melted)
- 1 cup of sugar
- 1/4 cup of molasses
- 1 egg
- 2 tsp of baking soda
- 1 tsp cinnamon
- 1 tsp pumpkin pie spice
- 1/4 tsp salt
- 3 cups of flour
Instructions:
- In a medium-sized saucepan, add the pumpkin, 1 1/2 cups of sugar, 2 tsp of pumpkin spice, and 2 tsp of cinnamon. Whisk together until fully mixed. In a small bowl, add the cornstarch and apple juice and mix until the cornstarch is dissolved.
- Add the cornstarch mixture to the pan and whisk until well combined. Cook over medium heat, bring to a boil, then simmer for 10 minutes, stirring occasionally. Remove from heat and let it cool.
- In a large bowl, add the melted butter and 1 cup of sugar. Beat using a hand mixer until it becomes thick, about 2-3 minutes. Add the molasses and egg, and continue beating until well mixed.
- Add the baking soda, cinnamon, pumpkin pie spice, salt, and flour. Beat using the hand mixer until everything is fully combined. You may need to add a little more flour until you can pinch a piece of the dough off and it doesn’t stick to your fingers.
- Place the dough in the fridge for 30 minutes. Once done, preheat the oven to 350°F. Lightly flour your surface and roll the dough out to about 1/4 inch thick. Use a cookie cutter or cup to cut out circles for the pumpkin shapes. Flatten the top slightly so it’s not a perfect circle, making it look more like a pumpkin.
- Ensure you have two pieces for each cookie: the bottom, which is bare, and the top, which will have the face. Take half of the pumpkin-shaped cookie dough and use a sharp knife to cut out triangle eyes and a mouth.
- Carefully lift the leftover dough out of the eyes and mouth and discard. Take 1 tbsp of the cooled filling and place it in the center of the bare, faceless cookie. Carefully lift the cut-out face cookie and lay it evenly over the top of the filling. Gently press the sides of the cookie with your finger to seal it. Repeat with all the others.
- Bake in the preheated oven for 10-13 minutes, making sure the middle nose area isn’t raw (it may cook slower). Let cool on a cooling rack for 10 minutes after they’ve rested on the baking sheet. Serve and enjoy!
4. Spooky Peanut Butter Cornflake Cookies
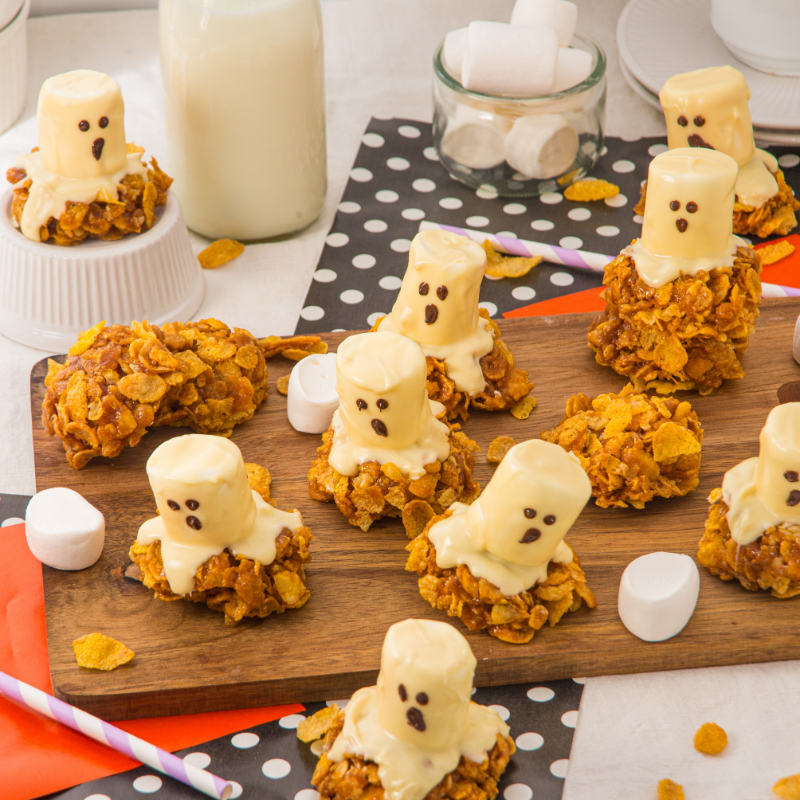
These spooky peanut butter cornflake cookies are one of those treats that are almost too cute to eat. They’ve got that perfect chewy-crunchy texture thanks to the caramel-coated cornflakes, with just the right hit of peanut butter to make them extra delicious. But the real fun is in the decorating, topping each cookie with a little marshmallow ghost and giving them goofy faces with melted chocolate. They’re so simple to make, but they look like something straight off a Halloween party table, and the kids absolutely love helping with the decorating part.
Want all the details? Head over to the full post for tips, variations, and a printable recipe card!
Servings: 18 cookies
Ingredients:
For the cookies:
- 4 cups corn flake cereal
- 1/2 cup peanut butter
- 1/2 cup syrup
- 1/2 teaspoon salt
- 1 teaspoon vanilla extract
For the decoration:
- 1 cup white chocolate, melted
- 1 tbsp dark chocolate, (for eyes and mouth)
- 18 marshmallows
Instructions:
Prepare the caramel:
- In a saucepan, combine the sugar, syrup, and peanut butter.
- Heat over medium heat, stirring constantly to prevent burning.
- Continue stirring until the mixture becomes smooth and caramel-like.
- Remove from heat once it’s smooth.
- Stir in the vanilla extract and salt.
- Mix well until fully combined.
Shape the cookies:
- Pour the hot caramel mixture over the cornflakes in a large bowl.
- Gently stir with a spatula to coat all the cereal evenly.
- Use a cookie scoop (size 20 recommended) to take portions of the mixture.
- Place each scoop onto parchment paper, a baking sheet, or a cooling rack.
- Slightly flatten each scoop to shape a cookie.
- Let the cookies cool at room temperature until they are set.
Halloween-style decoration:
- Melt the white chocolate in a heatproof bowl.
- Place a small amount of melted white chocolate on top of each cookie.
- Dip marshmallows into the melted white chocolate.
- Remove any excess white chocolate from the marshmallow with a fork.
- Place the marshmallows on top of each cookie.
- Let the chocolate cool and set (refrigerate if necessary).
- Use a toothpick dipped in melted dark chocolate to draw eyes and mouths on the marshmallows.
5. No Bake Cinnamon Toast Crunch Pie
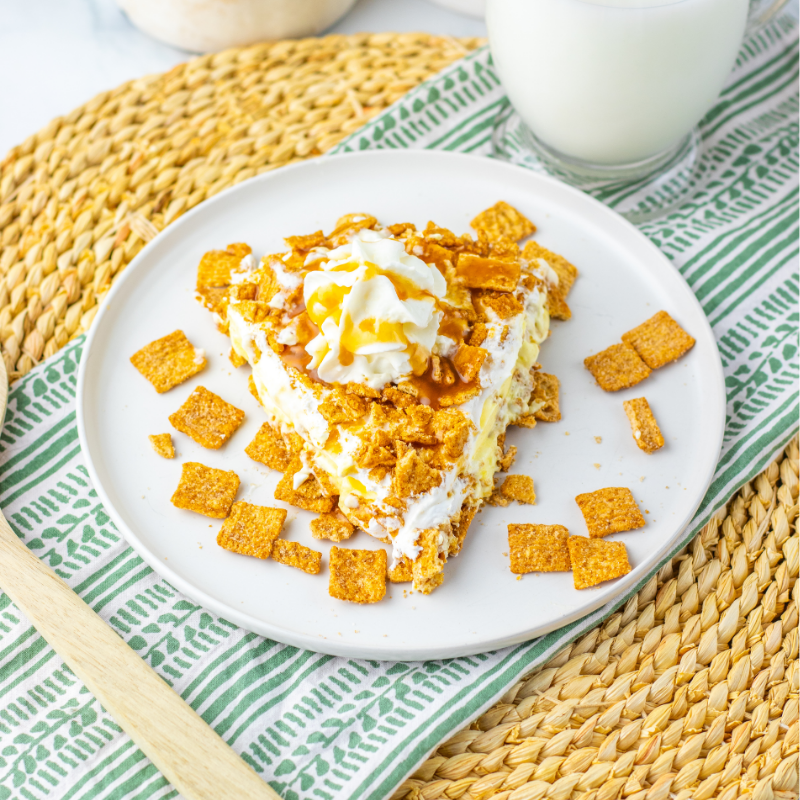
This no bake Cinnamon Toast Crunch pie is the kind of dessert that makes everyone’s eyes light up the second you set it on the table. It’s got that sweet, buttery cereal crust that tastes just like childhood, a creamy vanilla pudding filling, and of course plenty of crunchy cereal and caramel drizzled on top. The best part is how ridiculously easy it is to make, no oven, no fuss, just a few simple steps and you’ve got a dessert that feels both nostalgic and totally over-the-top. It’s the perfect treat for when you want something fun and festive without spending hours in the kitchen.
Want all the details? Head over to the full post for tips, variations, and a printable recipe card!
Servings: 6
Ingredients:
- 1 stick of unsalted butter (melted)
- 4 cups of Cinnamon Toast Crunch cereal
- 3 oz of French vanilla instant pudding mix
- 1 3/4 cup of milk
- 8 oz container of whipped topping (thawed)
- 2 cups of Cinnamon Toast Crunch for topping
- 1/3 cup of caramel for drizzle
Instructions:
- Add the 4 cups of cereal to a food processor until fine crumbs form. Add the crumbs to a bowl and add the melted butter, stir to combine. Add the crumbs to an 8 inch pie dish and spread evenly around and flatten.
- Add to the freezer for 10 minutes. To a large bowl add the pudding mix and milk, whisk until it becomes completely mixed together. Add only 1 cup of the whipped topping to the pudding. Stir once more to combine.
- Add the pudding mixture onto the pie crust and smooth out evenly. Add the rest of the whipped topping on top of the pudding mixture. Crush up the 2 cups of cereal and sprinkle on top. Add the caramel to a small zip lock bag and cut the tip off and drizzle the caramel all over top.
- Place the pie in the fridge for 2 hours or overnight. Slice and enjoy!
6. Pumpkin Cheesecake Mini Trifles

These pumpkin cheesecake mini trifles are one of my favorite little desserts to make in the fall because they look so fancy but couldn’t be easier to put together. I love the way the layers come together – soft pumpkin bread, creamy pumpkin cheesecake filling, crunchy ginger snaps, and a fluffy topping that makes every bite feel perfectly balanced. They’re great for parties since everyone gets their own little serving, and you can even make them ahead of time so you’re not scrambling at the last minute. Honestly, they’re like a cozy slice of pumpkin cheesecake in a cup, and I can never resist sneaking one from the fridge.
Want all the details? Head over to the full post for tips, variations, and a printable recipe card!
Servings: 8 mini trifles
Ingredients:
- 1 loaf pumpkin bread, cubed
- 16 ounces cream cheese, softened
- 1 cup sugar
- 15 ounces pumpkin puree
- 3 cups crushed ginger snap cookies, plus more for garnish
- 16 ounces frozen whipped topping, thawed
Instructions:
-
Whip the cream cheese and sugar together until the mixture is light and fluffy.
-
Mix in the pumpkin puree and continue beating until smooth.
-
Gently fold in half of the whipped topping.
-
Place the pumpkin bread pieces evenly at the bottom of each trifle dish.
-
Layer the pumpkin cheesecake mixture on top of the pumpkin bread.
-
Sprinkle ginger snap cookies over the cheesecake layer.
-
Spread the remaining whipped topping over the cookies.
-
Cover the dishes and refrigerate for at least four hours, or overnight for best results.
-
Before serving, garnish with extra ginger snap cookies and pumpkin bread pieces.
7. Pumpkin Dump Cake
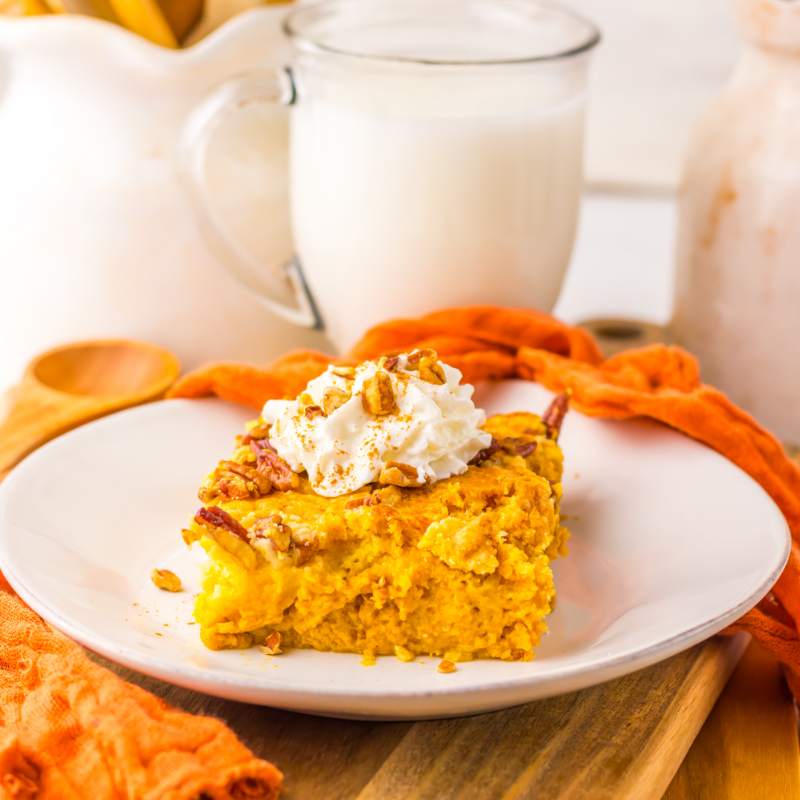
Pumpkin dump cake is one of those desserts I turn to when I want something cozy, easy, and absolutely irresistible. It’s got all the best parts of pumpkin pie – creamy, spiced filling with the bonus of a buttery cake and crunchy pecan topping that bakes up golden and delicious. I love that it comes together with just a few simple steps and no fussy prep work, which makes it perfect for busy fall days or last-minute get-togethers. Serve it warm with a scoop of vanilla ice cream or a dollop of whipped cream, and you’ve got the ultimate fall comfort dessert.
Want all the details? Head over to the full post for tips, variations, and a printable recipe card!
Servings: 8
Ingredients:
- 29 ounce can pumpkin puree
- 12 ounce can evaporated milk
- 3 eggs
- ½ cup brown sugar
- ½ cup white sugar
- 1 ½ teaspoons pumpkin pie spice
- 15.25 ounce box yellow cake mix
- 1 cup pecans
- 12 tablespoons butter, sliced
Instructions:
- Preheat your oven to 350 degrees.
- In a large bowl whisk together the pumpkin puree, evaporated milk, eggs, brown sugar, white sugar and pumpkin pie spice.
- Grease a 9×13 baking dish.
- Pour your pumpkin batter into the baking dish.
- Sprinkle the dry cake mix all over the top of the pumpkin mix.
- Place the sliced butter all over the top.
- Sprinkle with the pecans.
- Bake for 60-70 minutes or until a toothpick inserted comes out clean.
- Serve!
8. Pumpkin Fluff Salad
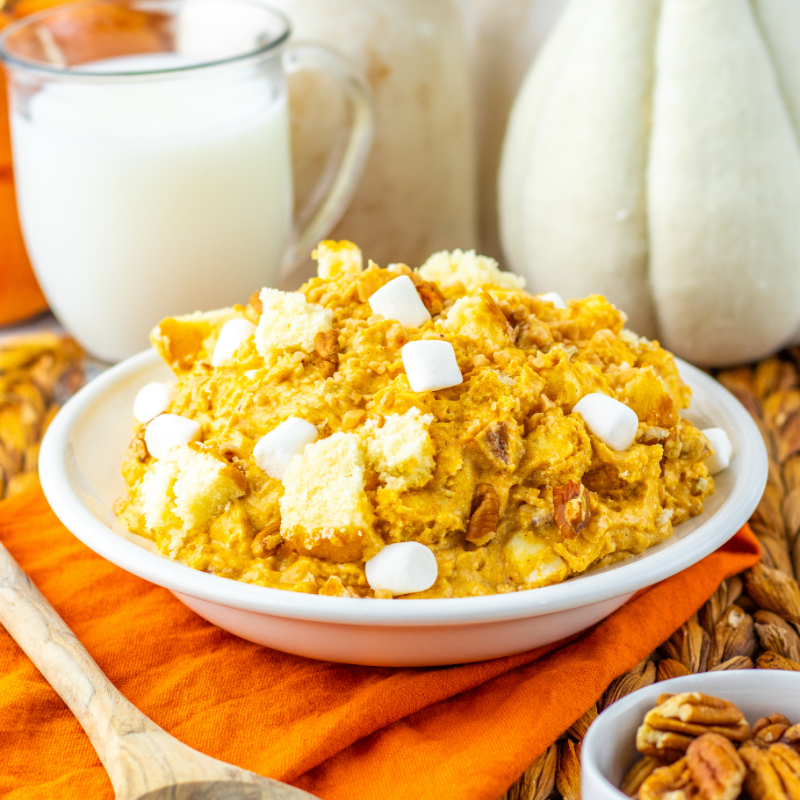
Pumpkin fluff salad is one of those desserts that feels like a cross between a cozy fall treat and a fun potluck classic. It’s creamy, fluffy, and packed with all the best mix-ins – sweet pound cake cubes, mini marshmallows, crunchy pecans, and a little toffee for good measure. I love how light and airy it is while still tasting totally indulgent, and it’s the kind of dessert that disappears fast anytime I bring it to a party. Plus, it comes together in minutes, which makes it a lifesaver when I need something festive without spending hours in the kitchen.
Want all the details? Head over to the full post for tips, variations, and a printable recipe card!
Servings: 8
Ingredients:
- 3.4 oz box of instant vanilla pudding
- 1 tbsp of pumpkin pie spice
- 3/4 cup of milk
- 1 cup of pumpkin puree
- 8 oz container of cool whip (thawed)
- 3 cups of cubed pound cake
- 1 1/2 cup of mini marshmallows
- 1/2 cup of heath bits (toffee bits)
- 1 cup of pecans (chopped)
Instructions:
- In a large bowl add the pudding mix, pumpkin pie spice and milk. Whisk until it becomes thick. Add in the pumpkin puree and stir. Add the cool whip and fold using a silicone/wooden spoon.
- Add the pound cake cubes, marshmallows, toffee bits, and pecans and stir carefully until completely mixed together.
- Place in the refrigerator for 15 minutes, once done serve and enjoy!
9. Pumpkin Gingerbread Poke Cake
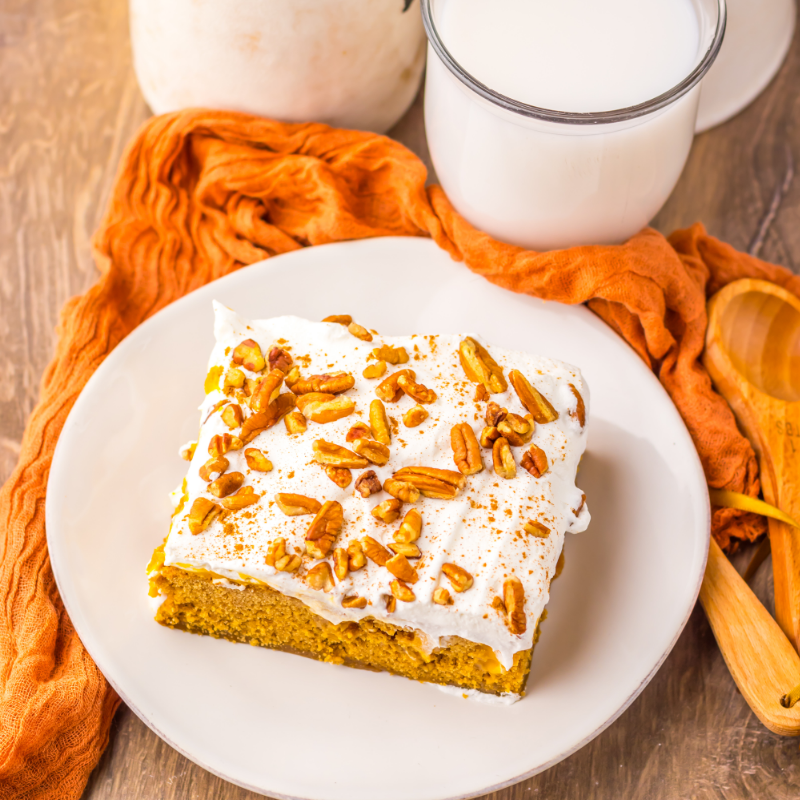
Pumpkin gingerbread poke cake is one of those desserts that feels like pure fall comfort in every bite. The warm, spicy gingerbread base pairs so perfectly with the creamy pumpkin pudding mixture that seeps into all the little holes, making the cake extra moist and flavorful. Topped with a fluffy layer of whipped cream and a sprinkle of toasted pecans, it’s a dessert that looks impressive but is actually super easy to throw together. I love serving this one at gatherings because it’s a little unexpected, but once people try it, they’re instantly hooked.
Want all the details? Head over to the full post for tips, variations, and a printable recipe card!
Servings: 12
Ingredients:
- 2 (14.5 ounce) boxes gingerbread mix
- 2 ½ cups water
- 2 eggs
- 15 ounce can pumpkin puree
- 3.4 ounce instant vanilla pudding mix
- 2 cups cold milk
- ¼ cup brown sugar
- 8 ounce container whipped topping
- 1 cup toasted pecans
Instructions:
-
Preheat the oven to 350°F.
-
In a mixing bowl, whisk together the gingerbread mix, water, and eggs until fully combined.
-
Spray a 9×13-inch baking dish with non-stick spray.
-
Pour the gingerbread batter into the prepared pan and bake for 40 minutes, or until a toothpick inserted into the center comes out clean.
-
Remove the cake from the oven and let it cool completely.
-
Once cooled, use the end of a wooden spoon or a smoothie straw to poke holes all over the cake.
-
In a large bowl, whisk together the vanilla pudding mix and milk until smooth.
-
Whisk in the pumpkin and brown sugar until well combined.
-
Pour the pumpkin mixture over the cake, making sure it fills the holes.
-
Top with whipped topping and toasted pecans.
-
Sprinkle with cinnamon, if desired.
-
Refrigerate for 4 hours to allow it to set.
-
Slice and serve!
10. Pumpkin Biscoff Truffles

These pumpkin Biscoff truffles are the kind of little treat that feels fancy but couldn’t be easier to make. The combination of creamy cookie butter, spiced pumpkin, and crushed Biscoff cookies creates the most irresistible filling, and once they’re dipped in white chocolate and sprinkled with cookie crumbs, they look like something straight out of a bakery. I love that they’re bite-sized, rich, and just the right amount of sweet, which makes them perfect for parties or gifting. Honestly, I have a hard time not sneaking one (or three) whenever I make a batch.
Want all the details? Head over to the full post for tips, variations, and a printable recipe card!
Servings: 20-22 truffles
Ingredients:
- 3/4 cup Biscoff cookie butter (not reduced-fat)
- 1/4 cup pumpkin purée (well-drained)
- 2 cups finely crushed Biscoff cookies
- 1/2 tsp pumpkin pie spice (optional)
- 1/4 tsp salt
- 3 tbsp heat treated all purpose flour OR oat flour
- 1/4 cup powdered sugar (adjust to taste and firmness)
To Decorate:
- 3/4 cup White Chocolate Candy melts or bakers white chocolate
- 1 tsp coconut oil
Instructions:
-
In a bowl, mix Biscoff cookie butter and pumpkin until smooth. Stir in pumpkin pie spice and salt. Add crushed Biscoff cookies and flour, and mix until well combined, ensuring the dough sticks together when pressed. Gradually add powdered sugar, a tablespoon at a time, until the dough is sweetened to your liking and firm.
-
Roll the dough into balls.
-
Refrigerate the truffles for 30 minutes (or freeze for 15–20 minutes) until the dough is very firm.
-
Melt candy melts with coconut oil in the microwave in 15–30 second intervals, stirring in between. Dip each truffle using a fork or toothpick, letting any excess drip off. Immediately sprinkle crushed Biscoff crumbs over the wet coating.
-
Let the truffles set at room temperature or refrigerate to speed it up. Store in an airtight container in the fridge for up to 5–6 days.
11. Pumpkin Blondie Mummies
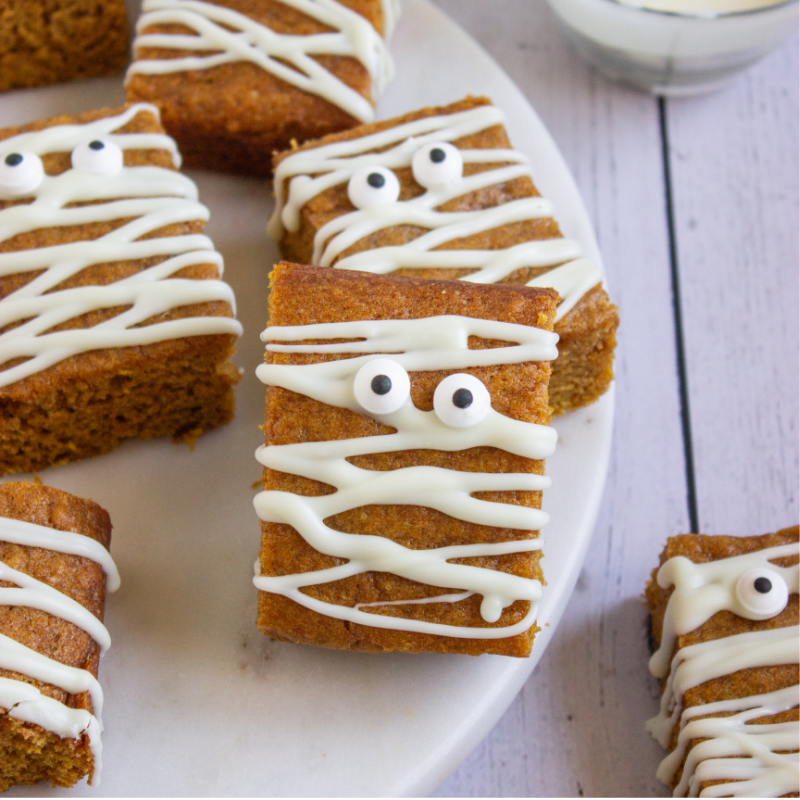
These pumpkin blondie mummies are one of the cutest Halloween treats I’ve ever made, and they taste just as good as they look. The blondies themselves are soft, chewy, and full of warm pumpkin spice flavor, but the real fun is in turning them into little mummies with drizzled white chocolate bandages and candy eyes. They’re such a hit with kids and adults alike, and I love how simple they are to decorate, no fancy skills required, just a little drizzle and a couple of eyes. They always bring a smile to the table and are perfect for parties, bake sales, or just a festive afternoon snack.
Want all the details? Head over to the full post for tips, variations, and a printable recipe card!
Servings: 12
Ingredients:
Pumpkin Blondies:
- 1/2 cup (1 stick) unsalted butter, melted
- 1 cup light brown sugar, packed
- 1/2 cup pumpkin purée (not pie filling)
- 1 large egg
- 1 tsp vanilla extract
- 1 1/4 cups all-purpose flour
- 1 tsp pumpkin pie spice
- 1/2 tsp cinnamon
- 1/2 tsp baking soda
- 1/4 tsp salt
Decoration:
- 1/2 cup white chocolate chips or white candy melts
- 1 tsp coconut oil (for smoother melted chocolate)
- Candy eyes (or mini chocolate chips)
Instructions:
- Preheat the oven to 350°F (175°C). Line an 8×8-inch pan with parchment paper and lightly grease it.
- Make the blondie batter: In a bowl, whisk together the melted butter and brown sugar. Add the pumpkin, egg, and vanilla, then mix until smooth. Stir in the flour, pumpkin pie spice, cinnamon, baking soda, and salt until just combined.
- Bake the blondies: Pour the batter into the prepared pan and smooth the top. Bake for 22–26 minutes, or until a toothpick inserted in the center comes out clean or with just a few moist crumbs. Let cool completely.
- Slice and melt chocolate: Once cooled, slice the blondies into rectangles to form the mummy bodies. Melt the white chocolate chips and coconut oil in the microwave in 20-second bursts, stirring between each, until smooth.
- Decorate the mummies: Use a spoon or piping bag to drizzle the melted white chocolate over each blondie to create mummy “bandages.” While the chocolate is still soft, press on the candy eyes.
12. Pumpkin Streusel Muffins
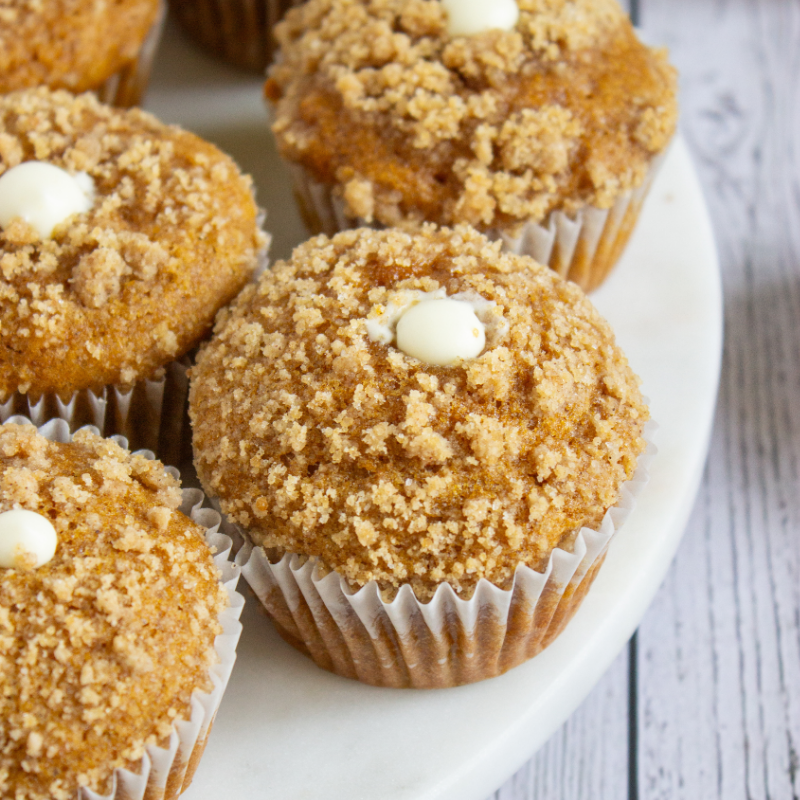
Pumpkin streusel muffins are one of my favorite fall bakes because they feel a little indulgent but are still perfect for breakfast or an afternoon snack. The muffins themselves are soft, fluffy, and full of pumpkin spice flavor, but what really makes them special is the crumbly streusel topping and that creamy surprise of sweet cream cheese filling. I love how cozy they smell while baking, and they’re the kind of treat that disappears fast in my house. Whether I’m serving them at a fall get-together or just making a batch to enjoy with my morning coffee, they never last long.
Read more about this recipe and print off a recipe card here.
Servings: 24
Ingredients:
Muffin Batter (Double Batch):
- 3 ½ cups all-purpose flour
- 2 tsp baking powder
- 1 tsp baking soda
- 1 tsp salt
- 4 tsp (1 tbsp + 1 tsp) cinnamon
- ½ tsp nutmeg
- ½ tsp ground ginger
- 4 large eggs, room temp
- 1 cup neutral oil (avocado, canola, etc.)
- 1 ⅓ cups brown sugar
- ½ cup white sugar
- 2 cups pumpkin purée
- ½ cup milk (dairy or non-dairy)
- 2 tsp vanilla extract
Streusel Topping (Double Batch):
- 1 cup flour
- ½ cup light brown sugar
- 2 tbsp white sugar
- 1 tsp cinnamon
- Pinch of salt
- ½ cup (1 stick) cold butter, cubed
Cream Cheese Filling (Double Batch):
- 6 oz cream cheese, softened
- 4–6 tbsp powdered sugar (to taste)
- 1 tsp vanilla extract
- ¼ cup heavy whipping cream
Instructions:
-
Preheat the oven to 350°F (175°C). Line 2 standard muffin pans (24 cups) with paper liners.
-
Streusel: Combine dry ingredients. Cut in cold butter until the mixture is crumbly. Refrigerate.
-
Batter: In one bowl, whisk together the dry ingredients. In another bowl, whisk the eggs, oil, and sugars. Stir in the pumpkin, milk, and vanilla. Gently fold in the dry ingredients until just combined.
-
Assemble: Fill the muffin cups ¾ full. Top generously with the streusel, pressing it down slightly.
-
Bake for 18–22 minutes, or until a toothpick inserted comes out clean.
-
Allow to cool completely.
-
Filling: Beat the cream cheese, sugar, and vanilla until smooth. Add the whipping cream and beat until combined and fluffy. Pipe the filling into the muffins using a round tip from the top or bottom, or swirl it on top.
13. Zombie Muddy Buddies
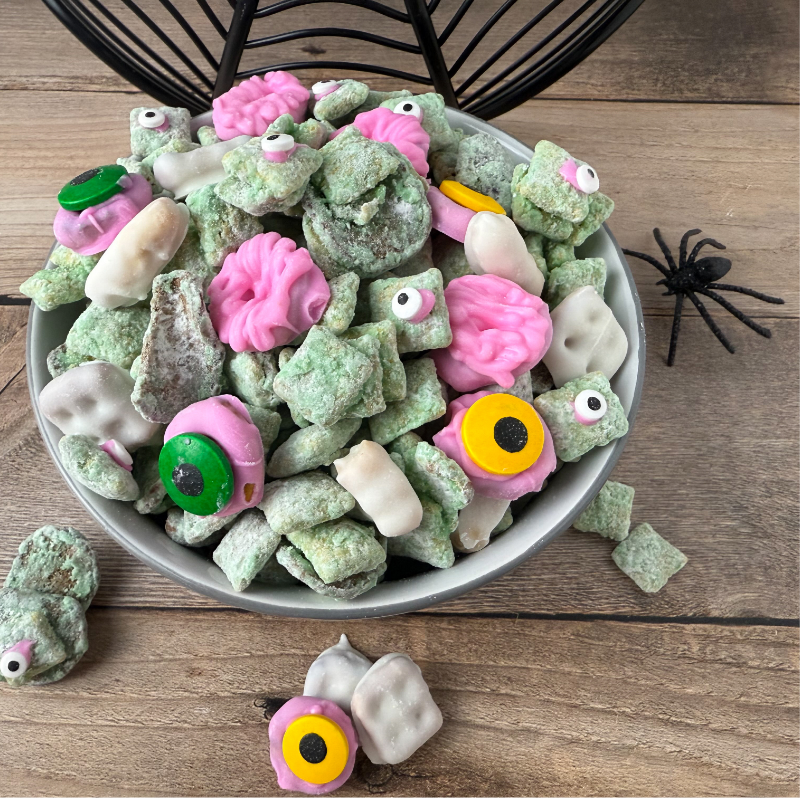
Zombie muddy buddies are such a fun twist on the classic snack mix, and they’re always a huge hit at Halloween parties. I love how playful they look with the green-coated Chex, candy eyeballs, pink “brains,” and little chocolate-dipped “bones” mixed throughout, it’s creepy in the cutest way possible. The best part is that it’s super easy to make in big batches, so you can whip up a bowl for movie night, pack some in treat bags for the kids, or set it out at a party for everyone to munch on. It’s sweet, crunchy, and just the right amount of spooky.
Want all the details? Head over to the full post for tips, variations, and a printable recipe card!
Servings: 7
Ingredients:
- 7 Cups Chex Mix
- 2 Cups Powdered Sugar
- 6 Ounces Green Melting Chocolate
- 3 Ounces Pink Melting Chocolate
- 2 Ounces White Melting Chocolate
- Eyeball Candy Sprinkles
- Multi Color Eyeball Candy Sprinkles
Instructions:
- Start by separating the different pieces from the Chex mix. Place the square pretzels and squiggle breadsticks in one small bowl, and the round pretzels in another.
- Add the remaining Chex mix to a large bowl.
- Melt the green chocolate melts in a microwave-safe bowl, heating in 30-second intervals and stirring in between until fully melted.
- Pour the melted green chocolate over the Chex mix in the large bowl.
- Use a spatula or gloved hands to mix until all of the Chex mix is coated.
- Sprinkle the powdered sugar over the coated Chex mix and mix again until everything is evenly covered.
- Spread the mix out onto a sheet of parchment paper to dry.
- Melt the white chocolate using the same method as the green chocolate.
- Lay out another sheet of parchment paper.
- Dip the square pretzels and squiggle breadsticks into the white chocolate using a fork, then place them on the parchment paper. These will represent the “bones.”
- Melt the pink chocolate using the same method as before.
- Dip the round pretzels into the pink chocolate and place them on the parchment paper to dry.
- Transfer any leftover pink chocolate into a piping bag (reheat it for 15–30 seconds if needed).
- Cut a small hole in the tip of the piping bag. Pipe a small line around the top of half the round pretzels and press multi-color eyeball sprinkles into the chocolate.
- On the other half of the round pretzels, pipe zigzag lines all over to create a “brain” effect. Let them sit for 5–8 minutes to harden.
- Use the remaining pink chocolate to attach small eyeball candy sprinkles onto the green Chex squares. Add as many eyes as you’d like.
- Let everything set for about 5 minutes to dry.
- Once dry, combine all the chocolate-decorated pieces with the rest of the Chex mix.
- Serve and enjoy!
14. Cookie Monster Puppy Chow

This cookie monster puppy chow is one of those treats that makes everyone smile the second they see it. The bright blue coating, cookie chunks, and silly candy eyeballs give it so much personality, and it’s just as tasty as it is fun. I love how the mix of Oreos, Chips Ahoy, and sweet powdered sugar-coated cereal comes together in every handful – it’s crunchy, chocolatey, and a little messy in the best way. It’s the perfect snack for a Halloween party table or even just a movie night with the kids, and I can never resist grabbing a big scoop for myself.
Want all the details? Head over to the full post for tips, variations, and a printable recipe card!
Servings: 8-12
Ingredients:
- 8 cups Rice Chex cereal
- 1 cup blue candy melts
- ½ cup creamy peanut butter
- ¼ cup butter
- 1 tsp vanilla
- 1 ½ cup powdered sugar
- 1 ½ cups Oreo Cookies, broken into pieces
- 1 ½ cups Chips Ahoy Cookies, broken into pieces
- Candy eyeballs
Instructions:
- Prepare a baking sheet with parchment paper.
- Melt the candy melts, peanut butter, and butter in a large microwave safe bowl in 30 second intervals, until melted. Stir in the vanilla.
- Pour the cereal into the bowl and toss to coat.
- Dump half the cereal into a gallon ziplock, then add half the powdered sugar. Shake the bag around until everything is coated in powdered sugar.
- Pour onto the baking sheet. Repeat step 4 the second half of candy coated cereal and powdered sugar.
- Dump it all back into the bowl, then fold in cookies.
- Spread mixture onto the parchment paper lined baking tray, and allow to set for about an hour.
- Store in an airtight container, then add candy eyeballs when ready to serve (if you add them in before serving, they will just get buried).
15. Halloween Candy Corn Cheesecakes
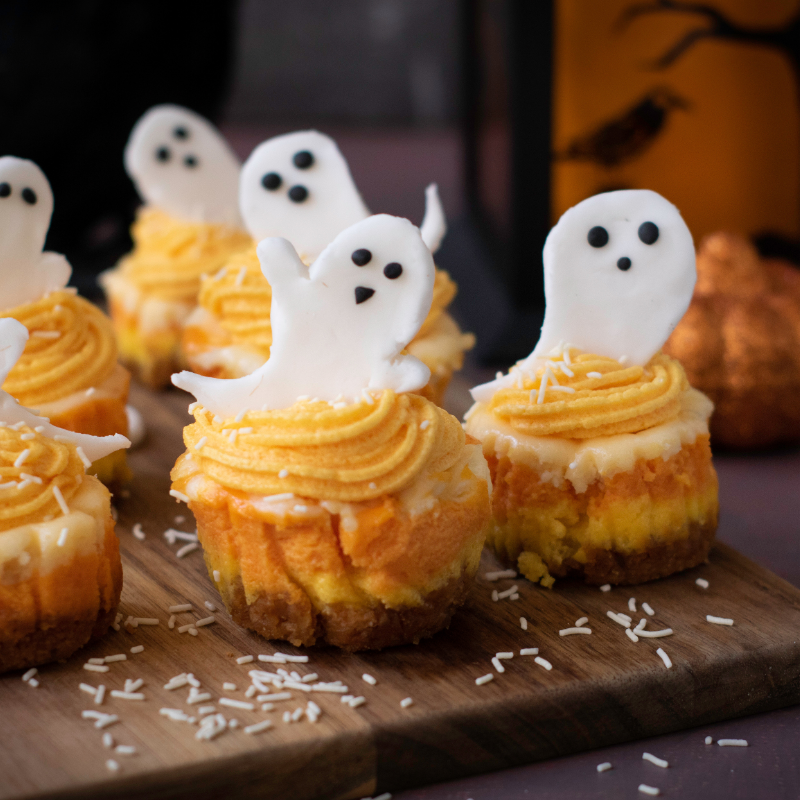
These Halloween candy corn cheesecakes are such a fun way to dress up a classic dessert for the season. I love how each bite has those playful layers of yellow, orange, and white to mimic candy corn, but with the rich, creamy flavor of cheesecake that everyone actually wants to eat. The little ghosts on top make them extra festive and add the perfect spooky-cute touch for a party or family treat. They’re bite-sized, colorful, and so much fun to serve, I can pretty much guarantee they’ll disappear faster than a bowl of real candy corn.
Want all the details? Head over to the full post for tips, variations, and a printable recipe card!
Servings: 12
Ingredients:
For the Crust:
- 1 cup graham cracker crumbs
- 2 tablespoons granulated sugar
- 1/4 cup unsalted butter, melted
For the Cheesecake Filling:
- 16 ounces cream cheese, softened
- 1/2 cup granulated sugar
- 2 medium eggs
- 1 teaspoon vanilla extract
- 1/2 cup sour cream
- Orange and yellow food coloring
For the Orange Frosting:
- 1/2 cup unsalted butter, softened
- 2 cups powdered sugar
- 2-3 tablespoons heavy cream
- 1 teaspoon vanilla extract
- Orange food coloring
For the Decorations:
- White sprinkles
- White sugar paste or fondant
- Black fondant or food coloring or edible marker
Instructions:
For the Crust:
- Preheat the oven to 325°F (165°C) and line a 12-cup muffin tin with cupcake liners.
- In a medium bowl, mix the graham cracker crumbs, granulated sugar, and melted butter until the crumbs are evenly coated.
- Divide the crumb mixture evenly among the cupcake liners, pressing firmly to form an even crust layer.
- Bake for 5 minutes, then set aside to cool slightly.
For the Cheesecake Filling:
- In a large bowl, beat the softened cream cheese with an electric mixer until smooth.
- Add the granulated sugar and continue beating until combined.
- Add the eggs one at a time, beating well after each addition.
- Mix in the vanilla extract and sour cream until smooth and creamy.
- Divide the cheesecake batter evenly into three bowls. Tint one with yellow food coloring, another with orange, and leave the last one plain.
- Spoon a layer of yellow batter into each cupcake liner, followed by a layer of orange, then a layer of plain batter.
- Bake for 18-20 minutes, or until the centers are set.
- Let the cheesecakes cool in the pan for 30 minutes, then refrigerate for at least 4 hours or overnight.
For the Orange Frosting:
- Beat the softened butter in a large bowl with an electric mixer until light and fluffy.
- Gradually add powdered sugar, beating until smooth and combined.
- Add heavy cream and vanilla extract, then beat until fluffy. Tint with orange food coloring.
- Once chilled, remove the mini cheesecakes from the liners and frost the tops with the orange frosting.
- Sprinkle white sprinkles over the frosted cheesecakes.
For the Sugar Paste Ghosts:
- Roll out white sugar paste or fondant and cut into small ghost shapes using a cookie cutter or knife.
- Use black food coloring or an edible marker to add eyes and mouths to each ghost.
- Place a ghost on top of each frosted cheesecake.
- Serve immediately or store in an airtight container in the fridge for up to 3 days.
16. Nutter Butter Ghosts
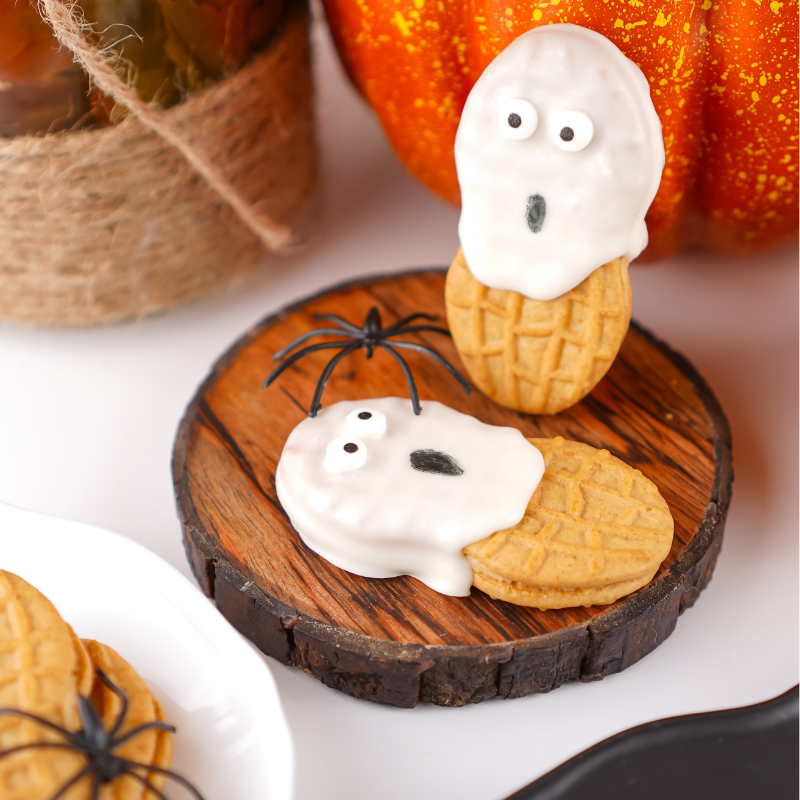
These Nutter Butter ghosts are one of the easiest Halloween treats I’ve ever made, but they always get the biggest reaction. There’s just something so fun about turning a simple cookie into a spooky little ghost with a quick dip in white chocolate and a couple of candy eyes. They’re the perfect mix of cute and creepy, and I love that they don’t take much time at all, you can whip up a whole batch in under 20 minutes. Whether I’m adding them to a dessert table or slipping them into treat bags, they’re always a hit with kids and adults alike.
Want all the details? Head over to the full post for tips, variations, and a printable recipe card!
Servings: 20 cookies
Ingredients:
- 20 Nutter Butter Cookies
- 2 Cups White Chocolate Chips
- Small Candy Eyes
- Black Edible Marker
Instructions:
-
Put the white chocolate chips into a small bowl or cup. I like using a coffee cup because it’s just the right size.
-
Microwave the chocolate on high for 2 minutes, stirring every 30 seconds until it’s completely smooth and creamy with no lumps.
-
If you want, wear gloves, then dip each cookie halfway into the melted chocolate, letting any extra drip off.
-
Hold the cookie upright and gently shake it or tap the uncovered end on a clean surface so some of the chocolate drips down the front, giving it a spooky ghostly look.
-
Set the cookie down on a piece of parchment paper.
-
Using baking tweezers if you have them, place two candy eyes near the top of the cookie. Have fun with it, it’s Halloween!
-
Repeat this process with all the cookies, then pop them in the freezer for 5 minutes to let the chocolate set.
-
Finally, use an edible black marker to draw little mouths near the edge of the white chocolate on each ghost cookie. Enjoy!
17. Chocolate Pumpkin Patch Brownies
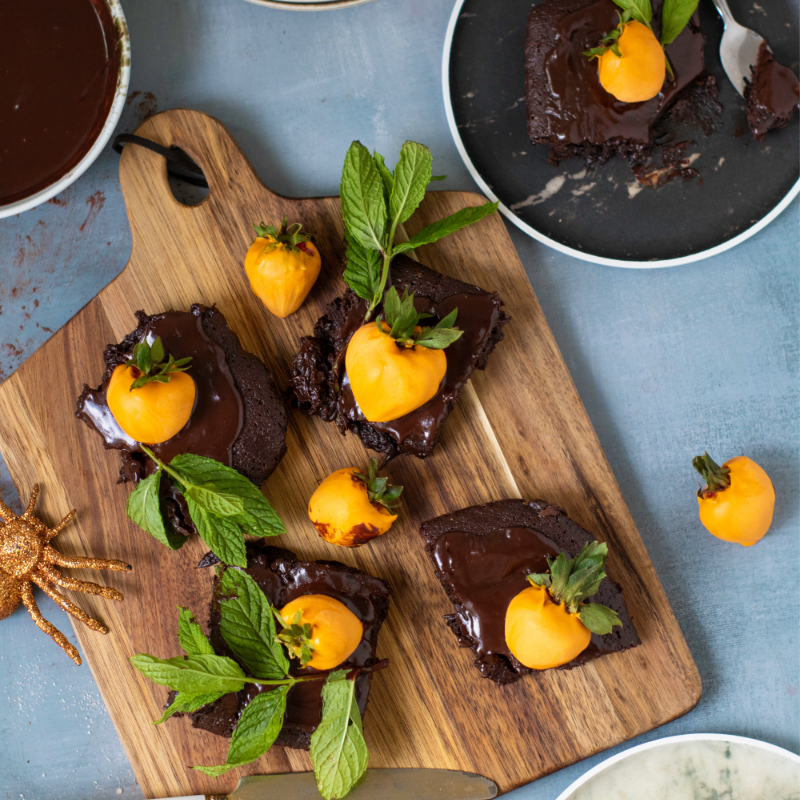
These chocolate pumpkin patch brownies are such a fun way to bring a little Halloween magic to a classic dessert. The rich, fudgy brownies are topped with silky chocolate ganache, but the real showstopper is the “pumpkin patch” made from orange-dipped strawberries with little sprigs of mint for vines. They look so festive lined up on a tray, and I love how easy they are to decorate even though they give off total bakery vibes. It’s one of those desserts that makes people stop and say “wow” before they even take a bite, and then they’re hooked once they do.
Want all the details? Head over to the full post for tips, variations, and a printable recipe card!
Servings: 16
Ingredients:
For the Chocolate Brownie Cake:
- 1 cup unsalted butter
- 2 cups granulated sugar
- 4 medium eggs
- 1 teaspoon vanilla extract
- 1 cup all-purpose flour
- 1 cup cocoa powder
- 1/2 teaspoon baking powder
- 1/4 teaspoon salt
For the Chocolate Ganache Frosting:
- 1 cup heavy cream
- 8 ounces dark chocolate, chopped
- 2 tablespoons unsalted butter
For the Pumpkin Patch Decoration:
- 12-15 fresh strawberries
- 1 cup orange candy melts
- Fresh mint or basil sprigs, optional to resemble vines
Instructions:
-
Preheat the oven to 350°F (175°C).
-
Line a 9×13-inch baking pan with parchment paper, leaving some overhang if you like for easy removal, and grease the parchment.
-
In a medium saucepan, melt the butter over medium heat. Remove from heat and stir in the sugar until combined.
-
Add the eggs one at a time, beating well after each addition. Stir in the vanilla extract.
-
In a separate bowl, whisk together the flour, cocoa powder, baking powder, and salt. Gradually add this to the butter mixture, stirring until fully combined.
-
Pour the batter into the prepared pan and spread evenly.
-
Bake for 25-30 minutes, or until a toothpick inserted in the center comes out with a few moist crumbs. Let the cake cool completely in the pan on a wire rack.
-
Meanwhile, heat the heavy cream in a small saucepan over medium heat until it just starts to simmer—do not boil.
-
Place the chopped chocolate in a heatproof bowl, pour the hot cream over it, and let sit for 2 minutes. Stir until smooth and fully combined.
-
Add the butter and stir until melted and the ganache is glossy. Set aside.
-
Wash and dry the strawberries thoroughly, then line a tray with parchment paper.
-
Melt the orange candy melts in a double boiler or following the package instructions.
-
Hold each strawberry by the stem and dip it completely into the melted candy. Place the coated strawberries on the prepared tray to set.
-
Remove the cooled brownie cake from the pan using the parchment overhang. Spread the chocolate ganache evenly over the top.
-
Press the dipped strawberries gently onto each brownie piece and arrange mint leaves around them to create a pumpkin patch effect.
-
Cut the frosted brownie cake into squares or rectangles to make individual brownies.
-
Serve right away or store in an airtight container at room temperature for up to 3 days. Enjoy your festive Chocolate Pumpkin Patch Brownie Cake!
18. Halloween Oreos
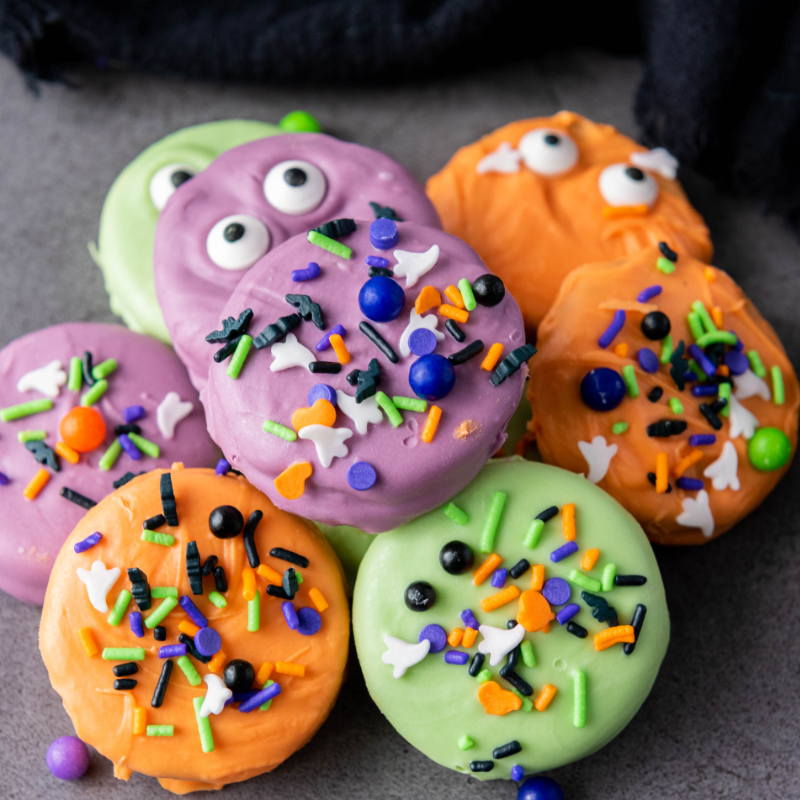
These Halloween Oreos are one of the easiest festive treats I make every year, and they never fail to bring a little extra fun to the dessert table. I love how just a quick dip in colorful candy melts and a sprinkle of spooky decorations can completely transform a regular Oreo into something party-ready. The best part is how customizable they are, you can mix and match colors, go wild with sprinkles, and let the kids get creative with decorating. They’re simple, sweet, and guaranteed to disappear quickly at any Halloween get-together.
Servings: 12
Ingredients:
- 12 Oreo cookies
- ¼ cup Purple candy melts
- ¼ cup Green candy melts
- ¼ cup Orange candy melts
- Halloween sprinkles (e.g., bats, pumpkins, ghosts, and other spooky shapes)
Instructions:
-
Line a baking sheet with parchment paper or a silicone baking mat.
-
Separate the Halloween sprinkles into small bowls for easy access.
-
Place the purple, green, and orange candy melts into three separate microwave-safe bowls.
-
Microwave each bowl individually in 30-second intervals, stirring after each until the candy melts are fully melted and smooth.
-
Using a fork or dipping tool, dip each Oreo cookie into the melted candy until fully coated. Let any excess drip off before placing the cookie onto the prepared baking sheet.
-
Dip 4 Oreos in purple, 4 in green, and 4 in orange candy melts for a colorful assortment.
-
While the candy coating is still wet, generously sprinkle Halloween sprinkles over the top of each Oreo.
-
Get creative with the sprinkles to make each Oreo festive and unique.
-
Let the decorated Oreos sit at room temperature until the candy coating hardens completely, about 30 minutes to an hour. To speed this up, place the baking sheet in the refrigerator for about 15 minutes.
-
Once set, arrange the Halloween Oreos on a festive plate or store them in an airtight container until ready to serve.
19. Halloween Candy Bark
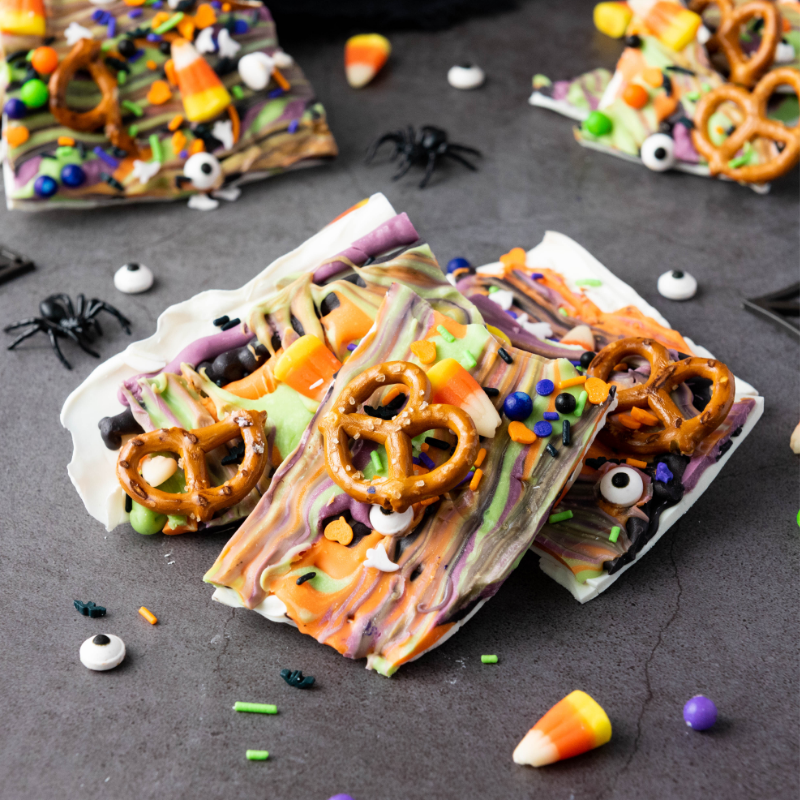
Halloween candy bark is one of my go-to treats when I want something festive, colorful, and super easy to make. I love how the swirled candy melts create this fun marbled effect, and then you can go crazy with toppings like candy corn, pretzels, and sprinkles to make it extra playful. It’s one of those recipes where there’s no wrong way to do it, and every batch comes out looking a little different but always so fun. Plus, it breaks into sharable pieces, which makes it perfect for parties, trick-or-treat bags, or just snacking on throughout the week.
Want all the details? Head over to the full post for tips, variations, and a printable recipe card!
Servings: 12
Ingredients:
- 12 oz white candy melts
- 1/4 cup orange candy melts
- 1/4 cup purple candy melts
- 1/4 cup green candy melts
- 1/4 cup black candy melts
- 1/2 cup candy corns
- 1/2 cup mini pretzels, broken into pieces
- Halloween-themed sprinkles
Instructions:
-
Line a baking sheet with parchment paper or a silicone baking mat.
-
Melt the white candy melts in a microwave-safe bowl by heating in 30-second intervals, stirring well after each until smooth and fully melted.
-
Pour the melted white candy onto the prepared baking sheet and spread it evenly with a spatula to about 1/4 inch thickness.
-
In separate microwave-safe bowls, melt the orange, purple, green, and black candy melts using 30-second intervals, stirring after each until smooth and fully melted.
-
Spoon dollops of each colored candy melt onto the white candy layer, then use a toothpick or skewer to swirl the colors together, creating a marbled pattern.
-
Immediately sprinkle candy corns, broken pretzels, and Halloween-themed sprinkles over the swirled candy. Press them gently into the surface so they stick.
-
Let the bark set at room temperature for 1 to 2 hours, or speed up the process by placing it in the refrigerator for about 30 minutes.
-
Once set, break the bark into pieces by hand or with a knife.
-
Store the Halloween candy bark in an airtight container at room temperature and enjoy your festive treat!
20. Bonfire Chocolate Nutella Cupcakes
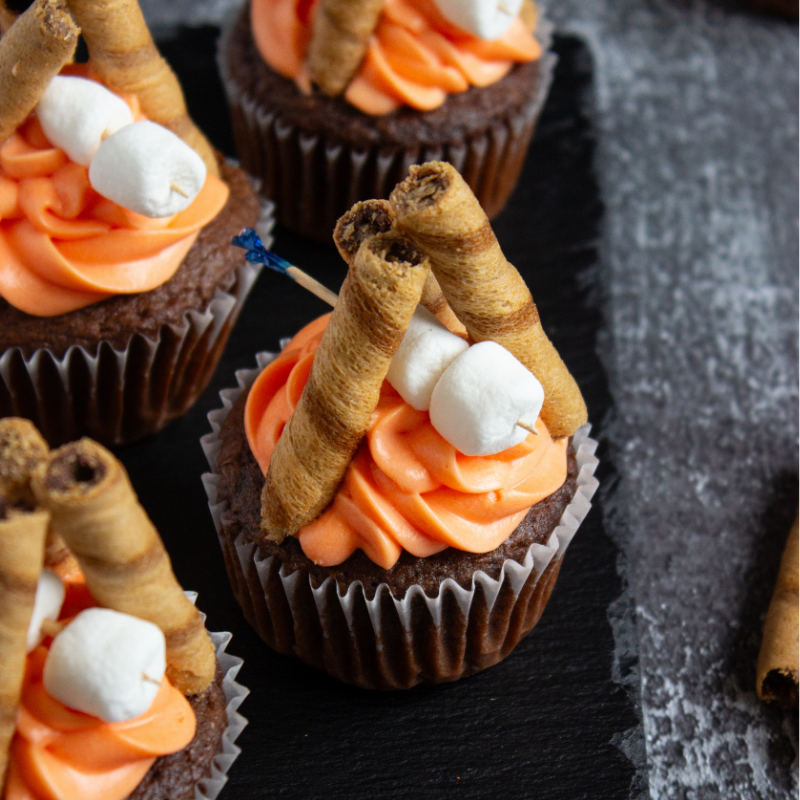
These bonfire chocolate Nutella cupcakes are hands-down one of the most fun desserts I’ve ever made for fall. Not only do you get a rich, chocolatey cupcake with a creamy Nutella filling, but the decorating turns them into little edible campfires complete with wafer “logs” and marshmallows on sticks. I love how playful they look lined up on a tray, they always get a big reaction and bring such a cozy, festive vibe. They’re perfect for Halloween parties, fall gatherings, or even just a fun weekend bake with the kids.
Want all the details? Head over to the full post for tips, variations, and a printable recipe card!
Servings: 24 cupcakes
Ingredients:
Cupcakes:
- 1 box chocolate cake mix
- 1 cup buttermilk
- 1/2 cup oil
- 3 large eggs
- 1 tsp espresso powder
Nutella Whipped Cream Filling:
- 1 cup heavy whipping cream, cold
- 2 tbsp powdered sugar
- 1/2 cup Nutella
Cream Cheese Frosting:
- 8 oz (1 block) cream cheese, softened
- 1/2 cup unsalted butter, softened
- 2 cups powdered sugar
- 1 tsp vanilla extract
- Orange food coloring or red and yellow food colouring (20 yellow and 6 red)
Decorations:
- Wafer sticks (like Pirouline or any rolled wafer cookies)
- Mini marshmallows
- Toothpicks
Instructions:
-
Preheat the oven to 350°F (175°C) and line cupcake pans with liners.
-
In a large bowl, mix together the cake mix, buttermilk, oil, eggs, and espresso powder until smooth (about 2 minutes).
-
Fill cupcake liners about 2/3 full with batter.
-
Bake for 18–20 minutes, or until a toothpick inserted into the center comes out clean.
-
Let cupcakes cool completely.
-
In a cold mixing bowl, whip the heavy cream with powdered sugar until soft peaks form.
-
Add the Nutella and continue whipping until stiff peaks form.
-
Transfer the Nutella whipped cream filling to a piping bag with a round tip (or use a zip-top bag with the corner snipped).
-
Using a small knife or cupcake corer, remove a small plug from the center of each cupcake.
-
Pipe the Nutella whipped cream filling into the center of each cupcake.
-
Beat the cream cheese and butter together until smooth and creamy.
-
Gradually add the powdered sugar, beating well after each addition.
-
Add vanilla extract.
-
Mix in orange food coloring until you reach your desired shade.
-
Pipe the orange cream cheese frosting on top of each filled cupcake, creating a small “bonfire flame” shape.
-
Break the wafer sticks into shorter pieces (about 2 inches long) to make “logs.”
-
Arrange 3–4 wafer pieces leaning around the frosting like a little campfire.
-
Thread two mini marshmallows onto a toothpick.
-
Stick the marshmallow “roasting stick” into the cupcake, nestling it between the frosting and wafer logs.
21. Pumpkin Cinnamon Rolls
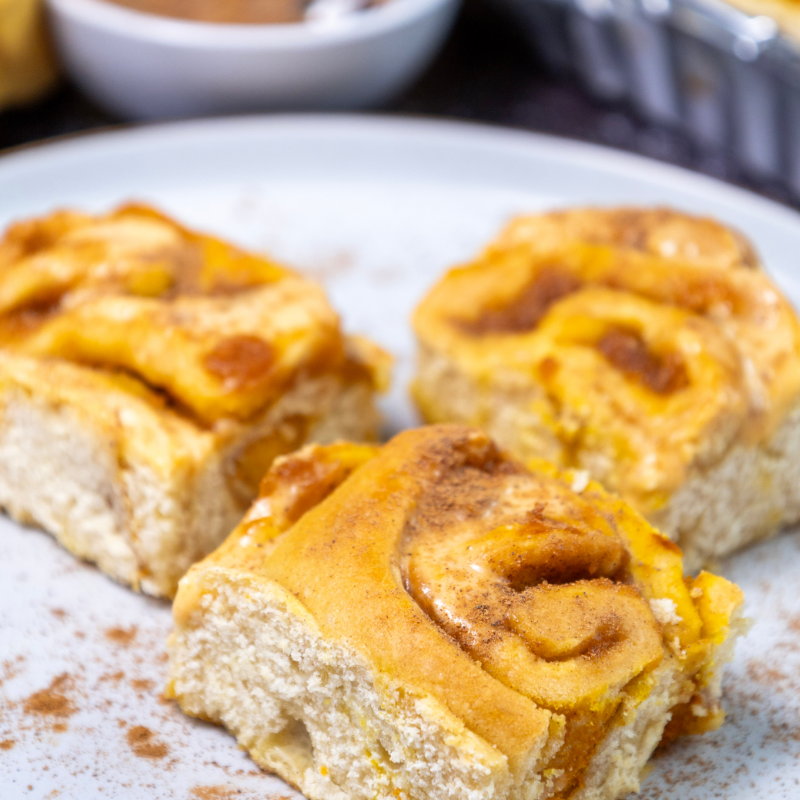
Pumpkin cinnamon rolls are one of those bakes that make the whole house smell like fall, and I can never resist sneaking one while they’re still warm from the oven. The dough is soft and fluffy, swirled with cozy pumpkin spice and a touch of sweetness, then topped with a creamy pumpkin cream cheese frosting that melts right into every layer. They feel like such a treat but are surprisingly simple to make, and they’re perfect for a Halloween morning breakfast, a fall brunch, or just because you’re craving something warm and comforting.
Servings: 18 small rolls
Ingredients:
- 1 cup milk
- 1tbs dry yeast
- 2 cups self-rising flour
- 1 tsp Cinnamon
- 1 tsp Nutmeg
- 2 eggs
- ½ cup Pumpkin puree
- 2 tbsp brown sugar
- 3 tbsp granulated sugar
- 1 stick melted butter
For the Frosting:
- 4 oz Cream cheese ( half pack of 8oz Philadelphia cheese )
- ¼ cup powdered sugar
- ¼ cup pumpkin puree
- 2 tbsp milk
Instructions:
-
Preheat your oven to 320°F. Warm the milk until it’s just lukewarm (not hot), then mix it with dry yeast and granulated sugar until dissolved. Let it sit in a warm spot to proof for about 10 minutes. Add the melted butter and eggs, then whisk gently until smooth.
-
Gradually add the flour to the mixture, kneading it into a dough. Dust the table with flour and knead the dough for about 2-3 minutes. Return it to the bowl and let it rise in a warm place for at least 30 minutes.
-
Once the dough has risen, roll it out with a rolling pin into a rectangle. Spread the pumpkin puree evenly over the dough.
-
In a small bowl, mix the cane sugar, cinnamon, and nutmeg. Sprinkle it over the rolled-out dough. Roll the dough up into a log and cut it into 1-inch thick rolls.
-
Line a 13×9-inch pan with parchment paper and arrange the cut rolls on it. Bake for about 20 minutes, or until golden brown.
For the Frosting:
-
In a small bowl, whisk together the cream cheese, powdered sugar, and pumpkin puree.
-
Add more powdered sugar and continue mixing until smooth.
-
If the frosting is too thick, add 1 tablespoon of water to reach the desired consistency.
-
Spread the frosting evenly over the freshly baked rolls.
-
Let the frosting set for 5-10 minutes before serving.
-
Sprinkle a pinch of cinnamon on top!
I had so much fun pulling together these spooky-sweet recipes, and I hope they give you as much joy in the kitchen as they do at the table. Whether you’re whipping up a quick batch of mummy blondies with the kids, setting out a colorful tray of Halloween Oreos, or going all out with a chocolate pumpkin patch, these treats are all about having fun and making memories. Halloween only comes once a year, so why not make it extra delicious with desserts that are just as playful as they are tasty?


